h3.post-title font-family: 'Bad Script', cursive
Showing posts with label metallic card. Show all posts

Friday, 31 July 2026

Under The Sea

Here is my entry for the Peartree Cutfile July Colour Challenge - This month the colour is turquoise.
I have chosen these photos of Florence at the Sensory Group when the theme was 'Under the Sea'. 

To make this layout I used:
Vitamin SEA peartree Cutfile 
Stormy Seas Peartree Cutfile
Metallic Cardstock - Turquoise
Bazzill Cardstock - Lagoon, Jade and Julep
Sizzix Diecut Set - Sea Animals
Distress Ink - Peacock Feathers
Doodlebug Designs - Alphabet Soup - Swimming Pool & Mint
Sequins
Scraps of Simple Stories patterned paper
Pinkfresh Studio Jewels - Sapphire & Ocean Breeze


Thanks for looking,
Lynn x

Saturday, 2 May 2026

Henry Charles Edwards

Here is my last design team layout made with the April Papermaze Kit. This one is rather a contrast to the pretty purple and lilac laypus made with this kit so far. I love this Mintay Papers - Man Cave collection - #5 paper, from the kit. I wanted to use it for a masculine layout using my new Vault Watch Gears Sizzix die set. I decided to scrap this photo of my husband's grandfather.

Please pop over to the Scrap, Paper Scissors Blog for full details of this layout. 

Here is a list of the items I chose from the kit:

Mintay Papers - Man Cave collection - #5
Bazzill Basics Cardstock - Date Swirl 

From my own collection of supplies, I used the following items:
Pearlised and metallic card
Chipboard
Stitched Rectangles Sizzix Die Set
Distress Inks 
Watercolour paper
A6 Sizzix 3-D Texture Fades Folder - Numbered
Distress Mica Sprays
Gilding wax 

Black Bazzill 
Acetate
Brads
Chain
3D foam 
49 and Market Krafty Garden Acetate Assortment
Tickets and stamps  
Embossing Powders


That's all from the April kit, although I still have papers, cardstock and embellishments left to use. 
Thanks for looking.
Lynn x


Friday, 17 April 2026

The Ritz

I am on the Papermaze Blog today, with two design team layouts I have created using the beautiful April Papermaze Kit.  The kit is full of pretty purple, lilac and grey papers. There is also a selection of embellishments and Bazzill cardstock to compliment the papers.

Here is the first of my layouts - My sister and her husband on a family trip to The Ritz to celebrate Mum's 80th Birthday. The papers matched perfectly with their outfits.

Please check out the 
Papermaze Blog for full details to make the layout.


From the Papermaze Kit, I chose the following items:

Uniquely Creative - Ultra Violet Delight collection - Layers in Lilac
Uniquely Creative - Bohemian Escape collection - Lazy Afternoon
Laser Cut Wildflowers
P13 Word Stickers 
Bazzill Basics Cardstock - Velvet & Heidi

I added itesm from my own stash:
1 sheet of scrap 12" x 12" paper
49 and Market - Plume and Petal Laser Cut Elements  
Art Deco font & Cricut
Metallic gold card 

Gold Letter Stickers


That's all for today, I will be back with more tomorrow. 
Thanks for looking.
Lynn x

Thursday, 26 February 2026

Colour By Numbers

While at the Papermaze Crop on Saturday, I made this layout for my daughter, Catherine's scrapbook.
In July 2023, the girls took part in the Sylvera School of Dance Summer show at The Orchard Theatre, Dartford. This is the group photo showing both girls and all the class. 


to make this layout, I used:
Black Bazzill
Bo Bunny - Double Dot collection - Passion Fruit
49 and Market - Spectrum Gardenia collection - Painted Foundations - Fragments
Silver Metallic Card
Gems
Cricut and the Art Deco font
Doodlebug Designs Alphabet Soup - Bubble Gum and Silver
Tracing Paper
Distress Ink - Picked Raspberry 


Thanks for looking
Lynn x

Monday, 25 August 2025

Peartree's 5th Birthday Celebrations: Challenge Four - Lynn's 6th Birthday Party

Challenge 4 from Peartree's 5th Birthday celebration challenges, is to use just five colours on your layout.I used this photo of my own 6th birthday party showing a few of my girldriends with our heads together over a book. Look at those hair ribbons! 

For this layout I cut the Treat 1 freebie cutfile for the 5th birthday celebrations. Thi!s has five candles, but maybe I should have added another one. 


I used a sheet of 49 and Market paper - Spectrum Gardenia - Painted Foundations - Backdrop. The cut file was cut using black Bazzill, and I backed it with three shades of red and white Bazzill, as well as gold and silver card. 

My title was made with Doodlebug Designs Alphabet Soup letters in Silver. I added a touch of Nuvo Glitter Drops to the dots on one of the candles. 


Thanks for looking.
Lynn x

Friday, 3 January 2025

Nativity

I am over on the Papermaze Blog today, with my last two Christmas layouts, using the December Kit. Here I am sharing the Nativity layout - The photo shows the children all dressed up for the annual Christingle service. For full details on how the layout was made, please go to the Papermaze blog.


Here is what I used from the kit:
Simple Stories - Simple Vintage Yuletide collection - Holiday Wishes and Filled with Wonder
Carta Bella - A Vintage Christmas collection - 3x4 Journalling Cards
Bazzill Basics Cardstock - Pomegranate Splash and Aspen

From my stash I used:
Festive Berries Distress Ink
Cream Bazzill
Gold Metallic Card
Holiday Traditions, die cut alphabet stickers from K and Co.
Seam binding ribbon
Tim Holtz, Sizzix Thinlits Seasonal Sketch set
Nuvo Crystal Drops


That's all from me for today. I'll be back with the last December layout tomorrow.
Thanks for looking.
Lynn x

Thursday, 12 December 2024

Oh, Christmas Tree

Here is the second of my December kit, design team layouts for the Papermaze Blog.The traditional colours and traditional themes in this kit are ideal for Christmas Tree shopping layout. Here you can see Florence picking her first Christmas Tree!


For details of how the layout was made, please see the Scrap, Paper Scissors Blog.

From the kit, I used:
49 and Market - Evergreen Season collection - Ceremonious Poinsettias
2 Holly Berry stems
Prima flowers
sequins
Bazzill Basics Cardstock - Aspen and Parakeet

From my stash, I used:
White acrylic paint
Sizzix Woodlands Thinlits set
Gold metallic thread
Gold metallic card
Cream card
AC Foam and cardstock Thickers - Sugarplum Wishes


That's all from me for today, I'll be back with more from this kit soon.
Thanks for looking.
Lynn x

Friday, 29 November 2024

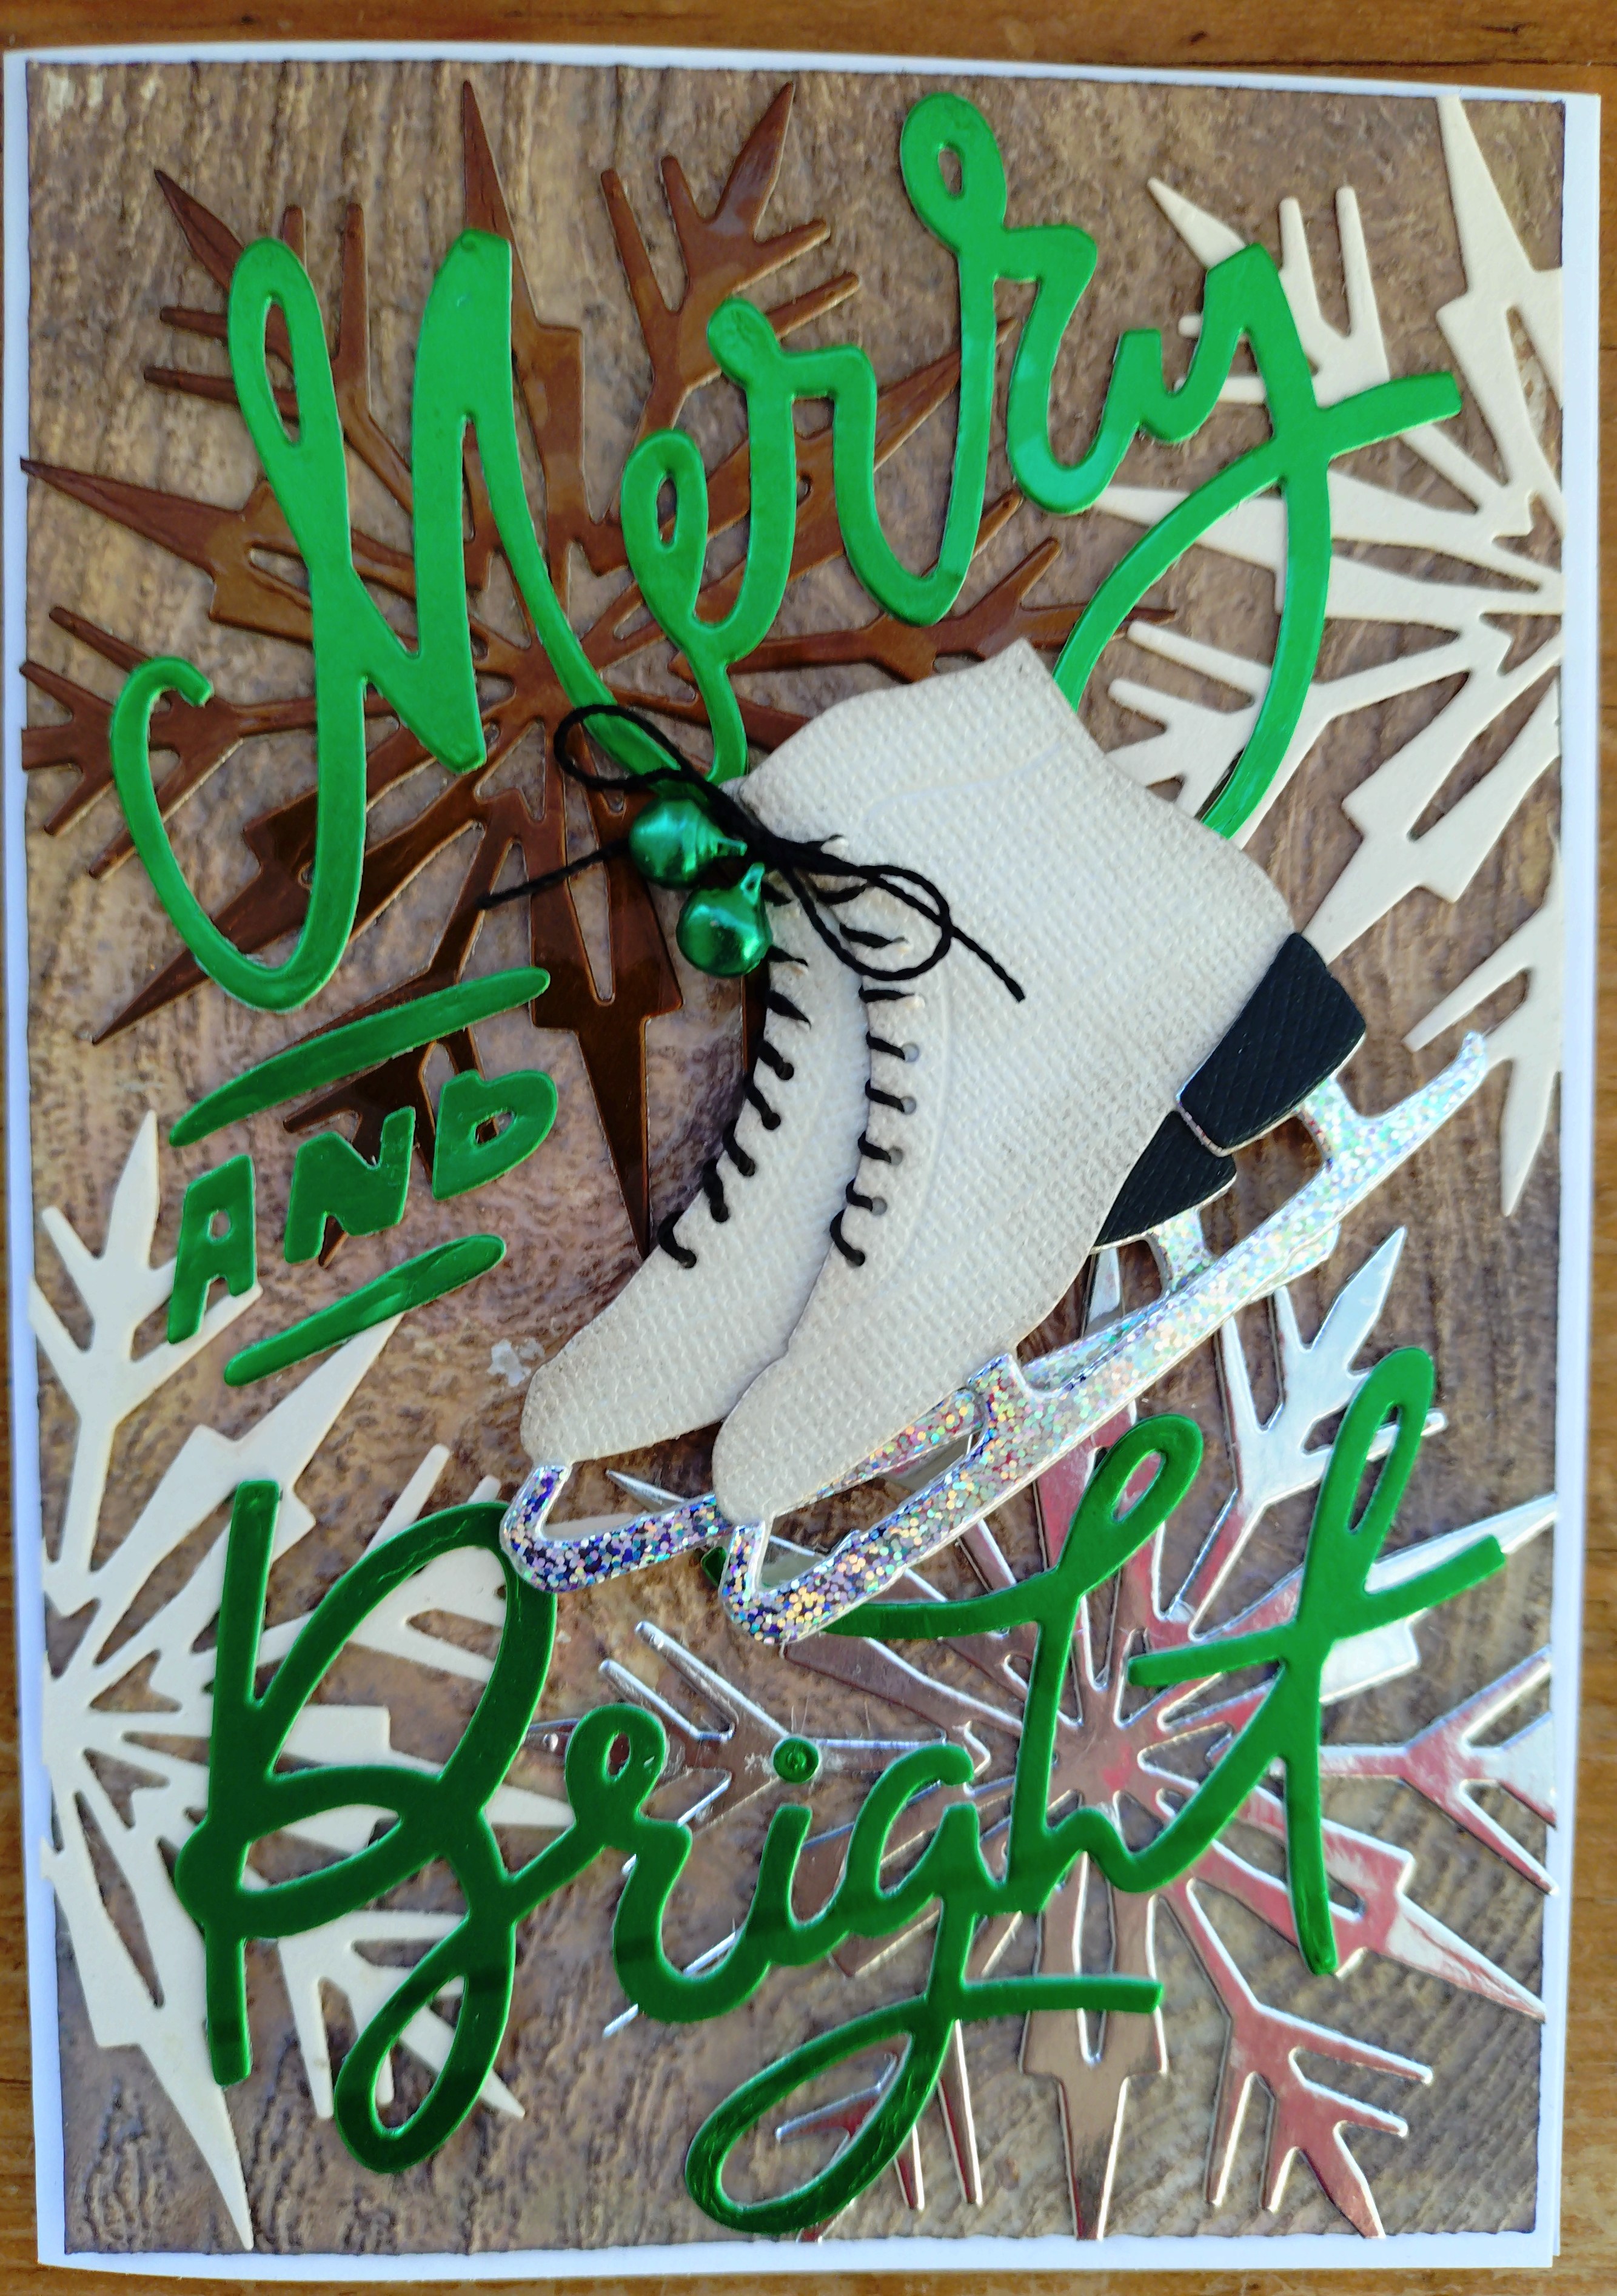
Vault Winter Wishes - Sizzix Christmas Cards

Today I'm sharing some Christmas cards I made using one of the Vault Christmas Sizzix Die Sets from Tim Holtz. I added in another of Tim's die sets and some 3D Texture Fades. Then got busy creating backgrounds with some multi media.


I used:

Sizzix Tim Holtz Thinlits Die - Vault Winter Wishes
Sizzix Tim Holtz Thinlits Die - Merry and Bright
Sizzix 3D Texture Fades - Arched, Brickwork, Lumbar, Quilted, Sparkle and Woodgrain.
Distress Oxide Inks
Distress Inks
Tiny Bells
DMC Crochet Cotton
Watercolour Paper
Card Blanks and Envelopes

Selection of cardstock and metallic cardstock scraps
3D Foam Pads

      
For each card I trimmed a piece of watercolour paper to measure slightly smaller than my card blank. I placed a selection of colours of Distress Oxide ink onto a messy mat. spritzed them with water and ran the paper back and forth through the colours to create the background for the card.

While the paper was still slightly damp, I place it into the 3D Texture Fade folder, and passed it through the Sizzix Big Shot. Then this was set aside to dry off completely.

I highlighted the embossed patterns by rubbing over with some Distress Inks and a blending tool.

With the Winter Wishes Die set, I cut two ice skates, heels and blades and three snowflakes,  from a selection of the scraps of cardstock and metallic card I had collected together. I also used the Merry and Bright die set to cut the phrase in metallic card.

I applied the snowflakes to the background, overlapping the edges in places and trimmed off the excess. This was then stuck to the front of the card blank.

I added the greeting placing it as seen in the photos.

Next I made up the ice skates, stitching the crochet cotton through the tiny holes in the boots to make them appear to be laced up, leaving enough
cotton to tie on the bells later. I placed one boot over the other at a slight angle so you can still see they are a pair. Then I tied the laces together in a knot. I threaded a tiny bell onto each lace, then tied the laces together into a bow, and trimmed the ends off neatly.

With 3D foam pads applied to the back of the ice skates, I attached them to the centre of the card.

Here is a closer view of each card.


That's all for today. Back with more for Christmas soon.
Lynn x