Some time ago I promised to share the cards I made for the magazine 'Quick Cards Made Easy'. I did about two of these then forgot. So I plan to resume this idea now. Starting with the cards I made for an article about making accordion cards. I was asked to make a selection of different cards and they had to be quite quick and easy to make.
I started off with how to make a basic accordion card, then gave details about decorating each one.
Using a 12”x12” sheet of card stock I measured out with ruler and pencil 30 x 14cm rectangle and cut with craft knife and metal ruler. Then I used a pencil and ruler again to mark out 7.5cm intervals across the length of the card, ending up with four sections and three lines. I scored these lines with a metal ruler and embossing tool.
Then I folded the card concertina style, so that the first fold is on the right side of the card when closed. A bone folder or ruler run down the length of the folds to make a nice sharp fold.
The first card is a baby boy card which is 12 x 7.5cm.
I used blue card as a base with scraps of yellow card. Baby boy buttons by Craftime. Rubber stamp alphabet by Hero Arts. Turquoise dye based ink pad. Glue dots and Baby Boy die cut card stickers by Doodlebug Design.
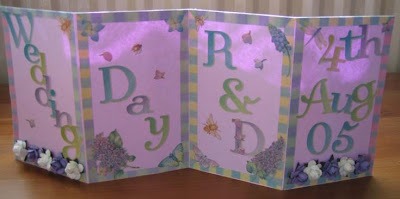
The next one is a wedding invitation. I used lilac card. Paper Roses from Hobbycraft. Juliana die cut alphabet by K & Co.
Around the edge of the sticker sheet is a fine (6mm) border, I peeled this away from the sheet and used it to frame each panel of the card, mitering the corners for a more attractive appearance.
I used the letters to spell out ‘WEDDING’ on the first panel and ‘DAY’ on the second panel. Picking out the ampersand and the bride and groom’s initials for the third panel and the wedding date on the fourth panel.
I selected a mixture of white and purple roses and applied them along the bottom of the first and fourth panels, where they will not become squashed when the card is closed. From the sticker sheet I selected flowers and insects to add more decoration.
The third card is a beach party card. I used beach and balloon buttons by Craftime, a fine black pen and sand print paper by PSX. More Juliana die cut alphabet by K & Co. and the Highlight LET font on the computer.
This time I used blue card and cut to 30x14cm. Score and fold at 7.5 cm intervals. I cut a strip of sand print paper to 30x8cm. Using the computer I typed in Highlight LET font the details for the party. I printed this in landscape format with the lettering to the right side of the paper. Then I cut along the top long edge following the wavy pattern on the paper and stuck it along the bottom of all four panels of the card.
Next I took the Juliana letter stickers to spell out the words ‘BEACH PARTY’ and arranged them in a wavy pattern above the sand. The buttons were then arranged and stuck down with glue dots. I drew strings from the balloon buttons so they appear to be tied to the letters and the sand castle.
More of these tomorrow. Thanks for looking.


These are all so pretty Lynn and each so individual..xxx
ReplyDelete