h3.post-title font-family: 'Bad Script', cursive
Showing posts with label Hero Arts. Show all posts

Wednesday, 30 December 2020

Happy 50th Birthday Elaine

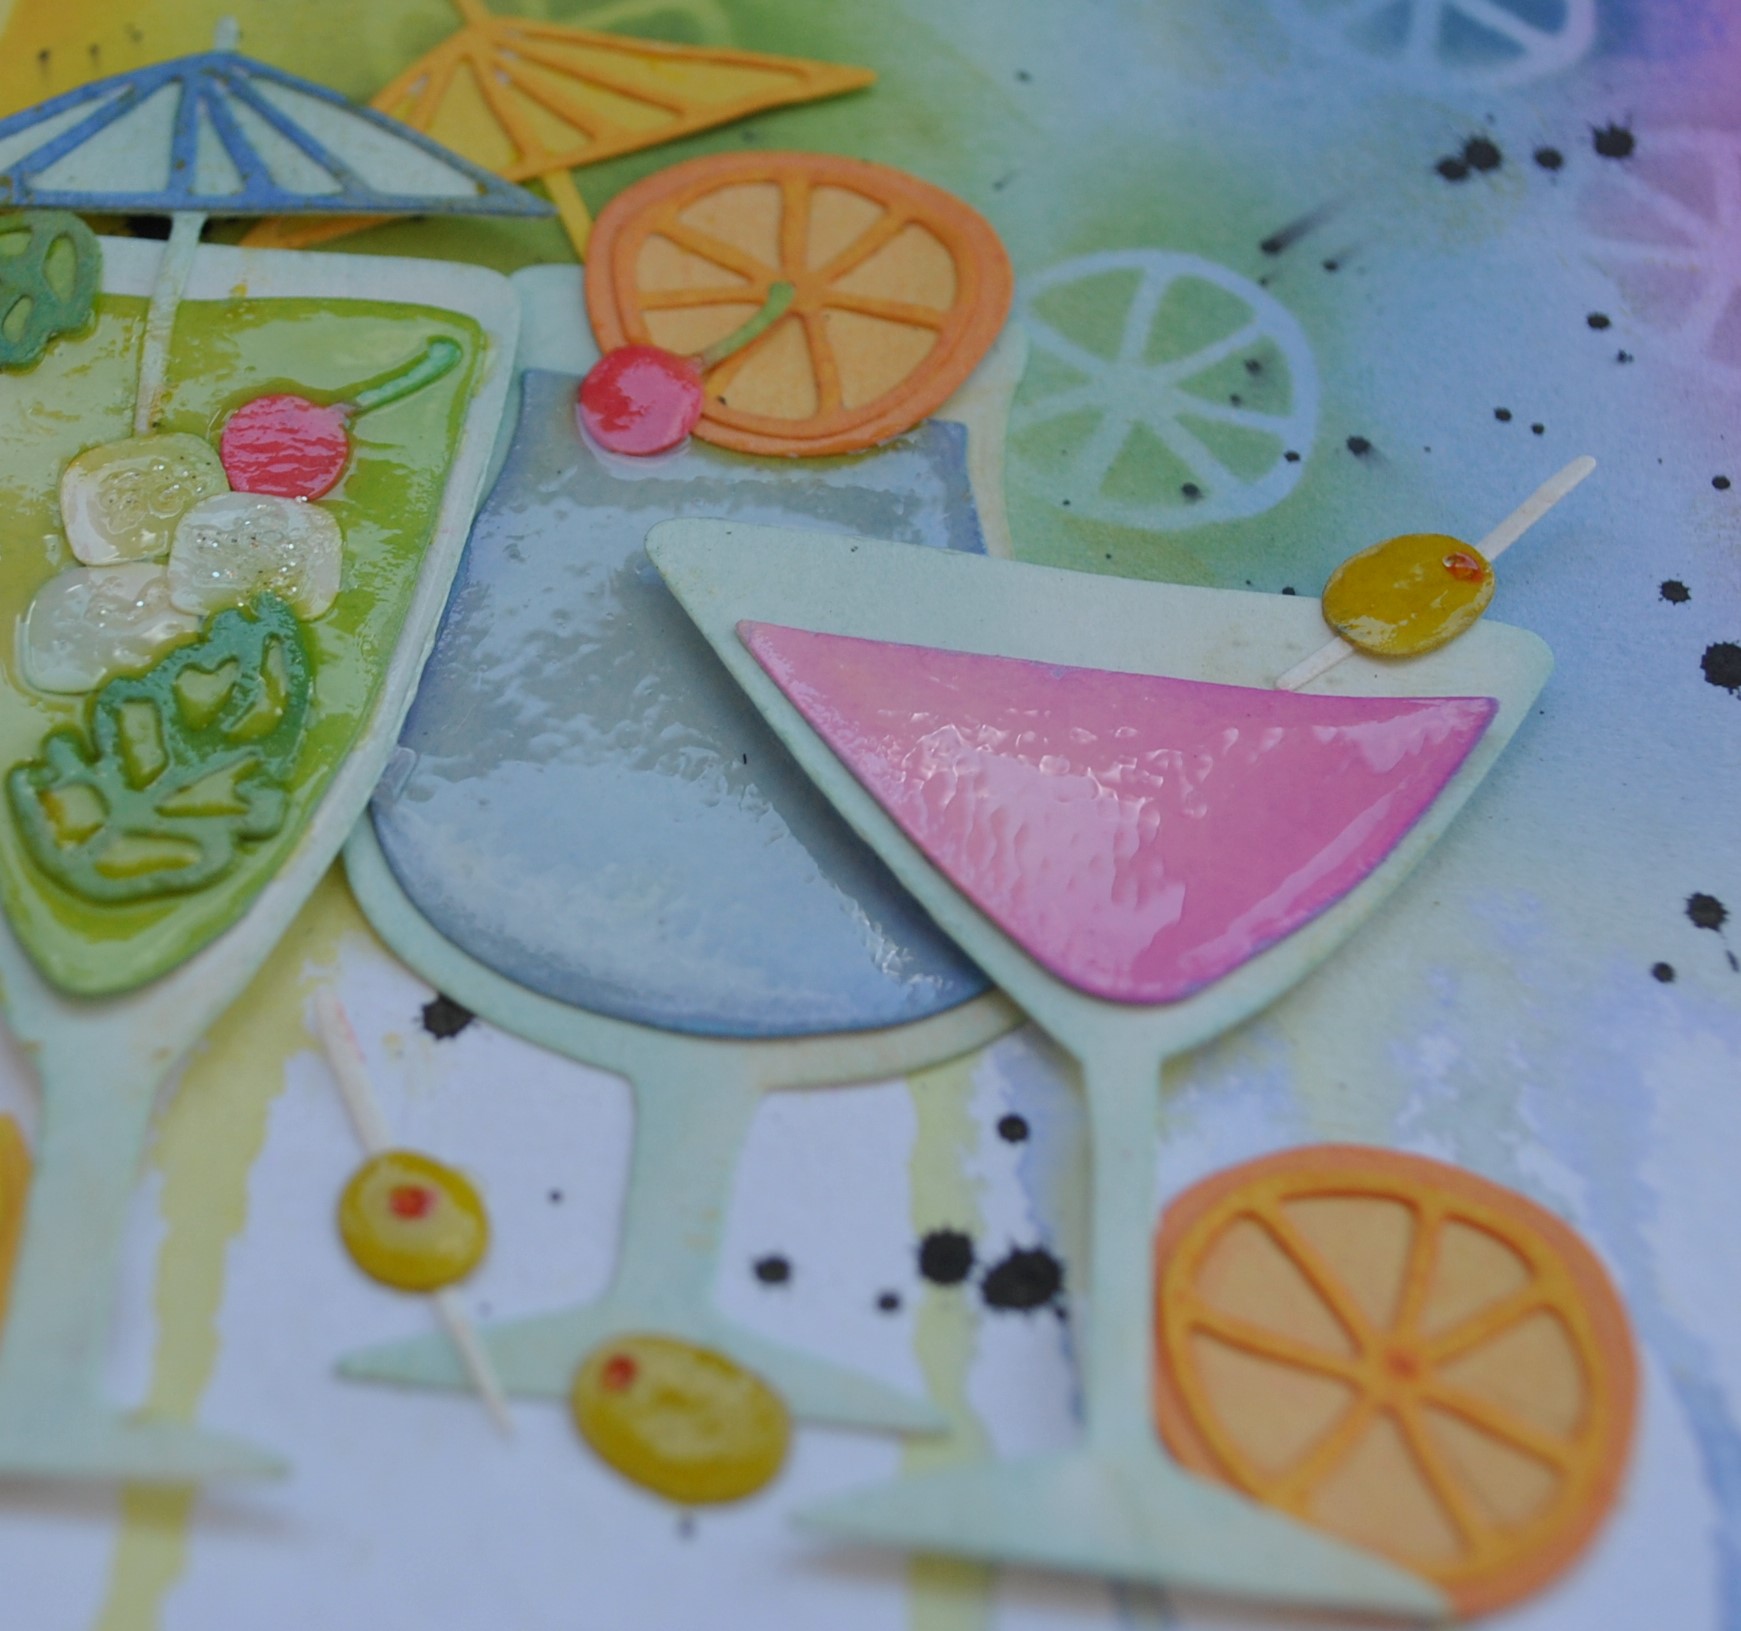
My brother asked me to make a card for his wife Elaine's 50th birthday earlier this month. I took inspiration from Kath Evans on the Sizzix website and Cathie Cowles on her blog.

I used watercolour paper and a selection of Distress Oxide Inks. The dies are a Tim Holtz Sizzix Thinlits set called Happy Hour.

I used Glossy Accents to make the glasses look shine, and a touch of Stickles to add sparkle to the ice cubes and fizzy drinks.


I splashed some Dylusions Black Marble Ink spray over the background paper, before adding the elements.

The letters were cut using Tonic Studios Windsor letter and number dies, and a Hero Arts greeting die.

Happy Birthday Elaine.
Thanks for looking
Lynn xxx

Sunday, 2 November 2014

52 Christmas Crackers 2014 - Week 43

A photo inspiration prompt for week 43 - in the form of a Pinterest pin. Here is my Christmas version of the challenge.Please see Kool Kitty Musings Blog for details of the challenge.


Here is a reminder of the prompt photo:


I Used:
Patterned papers - K and Co.
Die - Quickutz
Stamp - Hero Arts
Chalk Ink
Heart Brad
Gems
Kraft Tag

Thanks for looking
Lynn x

Wednesday, 15 October 2014

Silver and Blue for Christmas for Scrapology

The Scrapology Card challenge has been announced today for the month of October (it runs until 15th November).

Paula from Crafts U Love is challenging us all to make a Christmas card using Silver and Blue.

This is mine:


I used patterned paper from an old K and Company 6 x 6" paper pad
Card Blank - Craftwork Cards
Cardstock - Sugarcoated by Doodlebug Designs Inc. & Miri Card
Dies - Hero Arts (leaves), WPlus9 (letters) and Sue Wilson (Festive Collection Classic and Filigree Poinsettia)


Please go over to the Scrapology blog to read more about the challenge.

Thanks for looking
Lynn x

Sunday, 6 July 2014

52 Card Challenge 2014 - Week 25

Here is my card for the 25th challenge - details of this challenge please see Kool Kitty Musings Blog

Inspired by this Pinterest Pin - any form of weather needs to feature on the card, Natty says "go all cheery with rainbows and sun shines, feature cute puffy clouds, include an inspirational quote about silver linings and the like, and for winter you know what particular type of weather will work - snow!"
Here is my rainbow inspired card:

I used:
Papers and stickers by Echo Park - Summer Days Collection
Stamp - Hero Arts
Ink - Memento and Distress Inks
Pens - Promarkers and Gel Pen
Die - Sizzix
Cardstock for card blank - Bazzill


Thanks for looking
Back later with the Christmas version.
Lynn x

Thursday, 24 January 2013

Birthday Feathers


 For the month of January's card challenge on Scrapology is a colour wheel and Linda has challenged us to use LIME, PURPLE and SILVER on our cards.


My feathers were cut with the Cricut and the Art Nouveau Cartridge. 


The were inked and curled with scissors and layered up, before being stuck in place on the cards. The backing paper is from Magnolia. The Hero Arts stamp reads "Our birthdays are feathers in the broad wings of time". I added a lot of  crystal Stickles, miri card and some flat backed pearls and gems.


For the final one I used gold instead of silver.


Please go to the Scrapology Blog to see details of the challenge, and the cards made by the rest of the Design Team.
The challenge runs until 25th February.

Monday, 1 October 2012

I'm Gonna Learn How To Fly - CSI #39

For my father's 70th birthday we arranged for for him to have a flying experience in a Gypsy Moth. I have been meaning to scrap this photo ever since the flight during the summer after his birthday in 2004.  As he is 79 today I thought it was time!


This layout is my solution to CSI Case # 39.

A few close up views
This frame was made with Fimo Light and a Martha Stewart mold. Then it was painted with Titanium Gold acrylic paint before rubbing with Craft - T metallic rub on.
The leaves are punched with a Martha Stewart frond punch.


Some images are already on the papers including the news print.
The papers are Bo Bunny's Country Garden, I added rubber stamps from my Mississippi Memories Postage collection and some Hero Arts Biplane stamp.


The butterflies were cut from the paper scraps and flower stamen added for antennae  All glittered with Ice Stickles - crystal ice.

I used my new Memory Box dies for the railings and gate.


The title is created with My Little Shoe Box - Creme Brulee Tiny Type, and American Craft Thickers. The title is from the lyrics of Fame by Irene Cara.


teal - Taken from his shirt - Baker's Twine, lagoon acrylic paint, Teal High Heal Tattered, Lagoon acrylic paint with bubble wrap. Angels Glimmer Mist Chalkboard. Colorbox chalk ink in sour apple.
orange  - taken from the shading around the fairy - County Garden paper used as a border for the layout. Apricot Glimmer mist.
lime green - taken from the top of his head - Vines paper, title letters 'FLY'.
sky blue - taken from the beaker - Morning Sunrise paper, butterfly, brads.
bright buttery yellow - taken from his head - Ting Type letters, '70' number stickers, 


THE OUAS SKETCH - USE THE SKETCH AS INSPIRATION FOR YOUR DESIGN
You may interpret the elements in the design as you wish, but use the basic composition of the sketch.
You may flip or rotate the sketch to suit your design.
Have fun!

EVIDENCE - CHOOSE AT LEAST TWO ELEMENTS: (Items I included in blue)
rub-ons
, leaves, bird, star, little bits and pieces, use chalk or pastels, wings, book pages, globe or map print, frame

TESTIMONY - CHOOSE AT LEAST ONE ELEMENT: (Items I included in blue)
Put your journalling in a little booklet.
Frame your journalling -
Framed Dad's age.
Write your journalling on your photograph.
Journal about a lesson learned.- Journalling about a lesson on a long tag which is stored behind photo mat.
Journal in the form of a 
lesson plan. (Google lesson plan template for other ideas.)
Imitate 
All I Really Need to Know I Learned in Kindergarten (e.g., you could do All I Really Need to Know I learned from my cat... or from my trip to the beach... or from my kitchen, etc.).
Inspiration Words:
fly, learn, horizon-- use these as inspiration for your journaling, not just as a title.
My journalling tells of the day and the experience Dad enjoyed.
Thanks for looking.
Happy Birthday Dad.
Lynn x 


Monday, 11 October 2010

Happy 80th Birthday Beryl


This is the card I made for Alan's cousin Beryl. I can't believe she is 80 years old. My lovely friend Liz showed ma a card she made at The Glitter Pot recently, and I really liked the card and the stamp.  So when I visited the shop last month the Hero Arts Flower Tree stamp fell into my wire basket (quite loudly as it is a large wooden stamp!).

I used some double sided scrapbooking paper from Cardinal Colours. Twirling Circles by My Mind's Eye. The image was coloured with Promarkers and then I went mad with stickles, liquid pearls, gems, beads and pearls. I machine stitched around the image before mounting it to the card. The '80' is some spare foam Tickers stickers from American Crafts. The ribbon is from my stash, but I think it is by Doodlebug Designs.


HAPPY BIRTHDAY BERYL xxx

A little trip down memory lane for you Beryl...


Beryl's 21st Birthday


... and last year.

Tuesday, 22 June 2010

Accordion Cards Part 1

Some time ago I promised to share the cards I made for the magazine 'Quick Cards Made Easy'.  I did about two of these then forgot.  So I plan to resume this idea now.  Starting with the cards I made for an article about making accordion cards.  I was asked to make a selection of different cards and they had to be quite quick and easy to make.

I started off with how to make a basic accordion card, then gave details about decorating each one.
Using a 12”x12” sheet of card stock I measured out with ruler and pencil 30 x 14cm rectangle and cut with craft knife and metal ruler. Then I used a pencil and ruler again to mark out 7.5cm intervals across the length of the card, ending up with four sections and three lines. I scored these lines with a metal ruler and embossing tool.

Then I folded the card concertina style, so that the first fold is on the right side of the card when closed. A bone folder or ruler run down the length of the folds to make a nice sharp fold.

The first card is a baby boy card which is 12 x 7.5cm.
I used blue card as a base with scraps of yellow card. Baby boy buttons by Craftime. Rubber stamp alphabet by Hero Arts. Turquoise dye based ink pad. Glue dots and Baby Boy die cut card stickers by Doodlebug Design.


The next one is a wedding invitation. I used lilac card. Paper Roses from Hobbycraft. Juliana die cut alphabet by K & Co.

Around the edge of the sticker sheet is a fine (6mm) border, I peeled this away from the sheet and used it to frame each panel of the card, mitering the corners for a more attractive appearance.
I used the letters to spell out ‘WEDDING’ on the first panel and ‘DAY’ on the second panel. Picking out the ampersand and the bride and groom’s initials for the third panel and the wedding date on the fourth panel.

I selected a mixture of white and purple roses and applied them along the bottom of the first and fourth panels, where they will not become squashed when the card is closed. From the sticker sheet I selected flowers and insects to add more decoration.


The third card is a beach party card. I used beach and balloon buttons by Craftime, a fine black pen and sand print paper by PSX. More Juliana die cut alphabet by K & Co. and the Highlight LET font on the computer.
This time I used blue card and cut to 30x14cm. Score and fold at 7.5 cm intervals. I cut a strip of sand print paper to 30x8cm. Using the computer I typed in Highlight LET font the details for the party. I printed this in landscape format with the lettering to the right side of the paper. Then I cut along the top long edge following the wavy pattern on the paper and stuck it along the bottom of all four panels of the card.

Next I took the Juliana letter stickers to spell out the words ‘BEACH PARTY’ and arranged them in a wavy pattern above the sand. The buttons were then arranged and stuck down with glue dots. I drew strings from the balloon buttons so they appear to be tied to the letters and the sand castle.


More of these tomorrow. Thanks for looking.