h3.post-title font-family: 'Bad Script', cursive
Showing posts with label Clay. Show all posts

Tuesday, 22 December 2015

Gift Box for Christmas Decorations

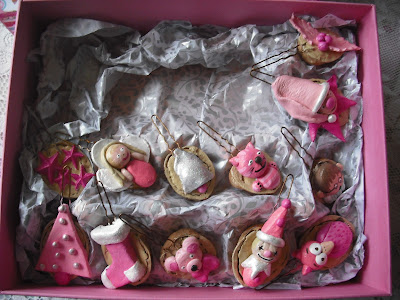
I made lots of friends and family sets of Walnut Christmas tree decorations a few years ago, and recently my sister asked for some more, her theme being pink, white and silver. So I set about making another 12 decorations for her. Once made I wanted a box to present them in that she could also use to store them in together with those I made her before.


Linda had given me some strong colourful boxes she no longer needed, and I remembered one of them was pink. Then  I selected some patterned papers from Papermaze - Sugarplums by Doodlebug Designs.


I decorated the box with two papers from the collection - Tiny Trimmings for the top & Christmas Trim for the sides. I used a Sizzix die to cut the lettering from corrugated cardboard, and painted them with Distress Paint (acrylic paints). They were then sprayed with pink iridescent glitter spray. Difficult to see the sparkle in the photos. I added some ribbon and a bow.


Inside of the box - lined with egg carton covered in Christmas tissue paper. with room to add the existing decorations.


Merry Christmas Sylvie
Thanks for looking
Lynn x

Thursday, 1 November 2012

Crazy Girl


Here is my design team layout for the November Scrapology Scraplift challenge.


The photos are of my daughter Emily, we were out for the evening for a meal to celebrate my husbands birthday while staying in Fairlight. She had just started wearing glasses.

This month we are scraplifting the lovely Lou who is a fellow design team member. This is her original Layout.

Here is our sketch

Here is how I made my page:
The papers are from My Mind's Eye, The Sweetest Thing - Honey Collection
Gut the pink Bazzill to give me a frame 1" deep (12" x 12").

Trim the bee patterned paper to 11" x 11". Gut some of the cream paper from under where the photo mat will be placed about 3" x 3". Also cut the lettering strip 'One of a Kind' from the background and set aside. Stick this paper centrally over the gold frame.

Cut the floral paper to measure 6" x 4" round the corners and stick to right of honeycomb and roses detail.

Cut chicken wire to measure about 8" x 5" and attach to page with the two decorative brads near the top corners.

With four small photos, stick to white cardstock to appear like a photo-booth strip. Stick to centre of wire with 3D foam pads. 

Using the Cricut I the Journalling plates and mats then stuck as shown to the left of the photo with 3D foam pads.  (All cut using the Lacy Labels cartridge. Cut in Cream 'To From' @ 3", Cut in Gold 'To From Shift' @ 3", Cut in Cream 'Hugs' @ 3", Cut in Pink 'Hugs Shift' @ 3". Also cut in Floral 'Welocme' @ 1 3/4", Cut in Gold 'Welocme shift' @ 1 3/4".)

Cut a bee in black cardstock and add to bottom of plates (Cut with Home Decor Cricut cartridge).

Punch a flower from the gutted paper, honeycomb side up, ink and curl petals and apply on top of title block to the right side with a sticky fixer pad. Cut title and add this over the top of the flower. (I used the Cricut and the 'Paisley' cartridge to cut the word  'Crazy'.) Apply off the edge of bottom right of wire using 3D foam Pads.

Make some clay flowers using Fimo Light and a Martha Stewart mold.  When dry paint these with the pink and yellow acrylic paints and glaze. Arrange on layout, sticking down with 3D foam pads or wet glue. Decorate these with the wired leaves, curling the wires round a pencil as you go.

Add some journalling by cutting patterned paper into 9mm strips to feed through the Dymo gun. cut into short lengths sand to reveal the white core where the letters are, then ink. Stick in place over the journalling plates.

Pop over to scrapology to see what the rest of the design team created and for more detials of the challenge and prize.

Wednesday, 24 October 2012

English Rose - Lake House

Using Lake House papers from Kaiser Craft I designed this class page for the Cardinal Colours Crop last weekend. The photo of my Mum was taken by my Dad.


I used a paper doily
Chrysanthemums, cherry blossoms, two sizes of roses and two sizes of rose leaves from Wild Orchid Crafts.


A cameo made with Lite Fimo air dry clay and a cake decorating mold painted with Acrylic paints and a scalloped oval cut with the Cricut.


Wide organza ribbon
Marianne die


Martha Stewart 3 in 1 Hydrangea punch 


Liquid pearls
The Title was cut with the Lucy alphabet and the Quickutz


Martha Stewart Round the page punches


Everyone seemed to enjoy the class and I'm looking forward to seeing their finished pages.
Thanks for looking
Lynn x

Here is the layout created by Sandra in my class:


And this is Anita's version:


Sunday, 14 October 2012

Make a Wish

It was my sister's 50th birthday back in April and I was looking through the photos of the celebrations and thought it would be good to scrap this photo of her with the gift we gave her.


This was made in answer to this week's C.S.I. challenge #40
Talk about last minute - the challenge closes in a few hours!


For my Evidence I used polka dots and stripes, Scalloped ovals for my journalling, banners using Stampin' Up punch, Numbers from My Little Shoe Box Tiny Type letter stickers. 

 For the TESTIMONY I chose to use bows on my journalling spots using light Fimo Clay and Martha Stewart clay moulds, painted pink. Three round journalling labels cut from Basic Grey's Basics papers. I used inspiration words - Wish, Special, Happy in my journalling.


The main papers used in this layout were left overs from a Girl's Paperie project I did a few years ago - Paper Girl.
The chipboard word 'WISH' was in my stash - I painted it pink and added a lot of glitter in the form of Ice Stickles.
The flower brads and felt flower strip has also been in my stash for ages, and I added some Paperchase flat backed stickers.
The embossed words 'Birthday', 'Happy' and 'Family' were stickers from a Making Memories kit I found in my stash. I think the big pink fabric Blossom is also from MM.
I used a Marianne Designs die and green cardstock for the leafy swirls.
The scalloped ovals were cut with a set of Sizzix Dies.
Black and pink Chalk Ink from Colorbox.


My journalling reads:
Sylvia - Celebrating your 50th birthday
14th April 2012
A very happy occasion with the family all together for the day. We had a meal at Eden Park followed by Andrew's Apple Pie Cake. your gift was the pink Filofax you wanted and a pen. x

Thanks for looking
Lynn xxx

Tuesday, 9 October 2012

Early Birthday Celebrations for Linda

It's not Linda's birthday until November, but she is unable to attend our crop next months so we made a special fuss of our friend this month instead.

I made Linda a card:


I used my newest Lili of the Valley Stamp and a selection of Doodlebug Designs Inc. papers, including a white embossed cardstock.


The image is coloured with promarkers, adding glitter to the sugar with stickles.
My greeting is another LOTV stamp, trimmed and added to a circle and a scalloped circle cut with Woodware punches. Dots of Liquid Pearls were added to the scalloped circle.


The strawberries were made with Lite air dry Fimo and a Martha Stewart mold. 
The strawberry flowers are some wired paper leaves from Wild Orchid Crafts and white paper punched with a Woodware 6 petal flower. The yellow flower centre is Liquid Pearls as are the green dotty swirls.


I cut 'LINDA's name on the Cricut.
I cut some images from the paper with a small circle punch and layered them up with 3D foam fixers. The stopper for the easel card is made by punching papers with a Martha Stewart border punch. 


I also baked Linda a cake, with raspberry ripple fondant.


We had a good crop as always.
Happy birthday for next month Linda! xxx


Monday, 1 October 2012

I'm Gonna Learn How To Fly - CSI #39

For my father's 70th birthday we arranged for for him to have a flying experience in a Gypsy Moth. I have been meaning to scrap this photo ever since the flight during the summer after his birthday in 2004.  As he is 79 today I thought it was time!


This layout is my solution to CSI Case # 39.

A few close up views
This frame was made with Fimo Light and a Martha Stewart mold. Then it was painted with Titanium Gold acrylic paint before rubbing with Craft - T metallic rub on.
The leaves are punched with a Martha Stewart frond punch.


Some images are already on the papers including the news print.
The papers are Bo Bunny's Country Garden, I added rubber stamps from my Mississippi Memories Postage collection and some Hero Arts Biplane stamp.


The butterflies were cut from the paper scraps and flower stamen added for antennae  All glittered with Ice Stickles - crystal ice.

I used my new Memory Box dies for the railings and gate.


The title is created with My Little Shoe Box - Creme Brulee Tiny Type, and American Craft Thickers. The title is from the lyrics of Fame by Irene Cara.


teal - Taken from his shirt - Baker's Twine, lagoon acrylic paint, Teal High Heal Tattered, Lagoon acrylic paint with bubble wrap. Angels Glimmer Mist Chalkboard. Colorbox chalk ink in sour apple.
orange  - taken from the shading around the fairy - County Garden paper used as a border for the layout. Apricot Glimmer mist.
lime green - taken from the top of his head - Vines paper, title letters 'FLY'.
sky blue - taken from the beaker - Morning Sunrise paper, butterfly, brads.
bright buttery yellow - taken from his head - Ting Type letters, '70' number stickers, 


THE OUAS SKETCH - USE THE SKETCH AS INSPIRATION FOR YOUR DESIGN
You may interpret the elements in the design as you wish, but use the basic composition of the sketch.
You may flip or rotate the sketch to suit your design.
Have fun!

EVIDENCE - CHOOSE AT LEAST TWO ELEMENTS: (Items I included in blue)
rub-ons
, leaves, bird, star, little bits and pieces, use chalk or pastels, wings, book pages, globe or map print, frame

TESTIMONY - CHOOSE AT LEAST ONE ELEMENT: (Items I included in blue)
Put your journalling in a little booklet.
Frame your journalling -
Framed Dad's age.
Write your journalling on your photograph.
Journal about a lesson learned.- Journalling about a lesson on a long tag which is stored behind photo mat.
Journal in the form of a 
lesson plan. (Google lesson plan template for other ideas.)
Imitate 
All I Really Need to Know I Learned in Kindergarten (e.g., you could do All I Really Need to Know I learned from my cat... or from my trip to the beach... or from my kitchen, etc.).
Inspiration Words:
fly, learn, horizon-- use these as inspiration for your journaling, not just as a title.
My journalling tells of the day and the experience Dad enjoyed.
Thanks for looking.
Happy Birthday Dad.
Lynn x 


Thursday, 9 December 2010

JYC 9th December

Journal Your Christmas - 9th December 2010
Nuts about Decorations

Today's prompt is about tradition and our walnut shell decorations have become a family tradition over the years.
Sylvia's Set

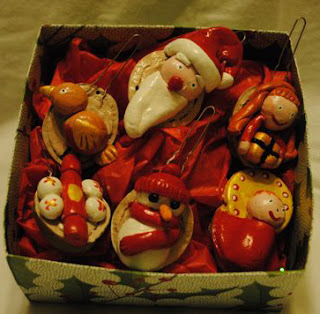
I made my first set of walnut ornaments many years (20'ish) ago and they have always been popular. I started off with a set of about 12 for our tree. About 10 years later I made three sets of six as Christmas presents for a few friends. Then last year my sister asked if I would make her some, as her tree is all white, silver and pink  decided to pain her set in those colours. I wanted to make a gift for all my special scrapbooking friends at our monthly crop at Cardinal Colours so I asked them all what their Christmas tree colour scheme is, and set to work.


To make these decorations I use Walnuts, carefully split in half with hammer and chisel ( a two person job). Air dry clay such as DAS, hair pins, acrylic paints, gloss varnish and ribbon. Empty egg cartons and some blutac type adhesive is also useful.

clay drying

The half walnut shell is filled with a ball of clay and the pin is pressed into the top and bent over to form a hook. then the character is created with more clay, using just water to hold the pieces together. They need to be left to dry for about 24 hours.

painting in progress

varnished pieces stuck to tray with blutac to dry


One traditional colour set lined up all complete.

Baby Jesus

Cracker

Robin

Santa

Snowman

Second traditional set. These were for Anita and Ange.

Blue and gold set for Chris' white tree.

Blue and silver set for Liz.

Second pink and silver set for Sue.
Here you can see ribbons tied to each hair pin for attaching the decorations to the tree.

Purple and lime green set for Linda

Red and gold set for Wendy

Red and white set for Jill.

Third traditional set for Robert and Elaine.

Hope you all enjoy your decorations for many years to come. xxx