h3.post-title font-family: 'Bad Script', cursive

Wednesday 29 August 2018

Hannah and Mercury

Here is my entry for the Get Crafty August Sketch challenge. The photographs are of Hannah holding the owl Mercury at JAMBS Owls, Hall Place, Bexley


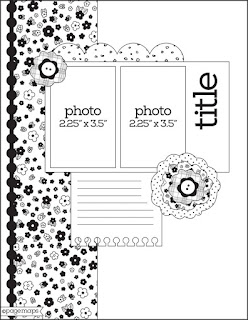
Here is the sketch:

I used a selection of papers from different collections by Kaisercraft.
The feather paper 'Plumology' from the Anthology collection, which was gutted so the reverse could be used for the title block and also the deep edge punch strip. For the latter I used a Martha Stewart punch.
The wood effect paper is called 'Gallery' and is from the Keepsake collection. This was distressed and inked with Distress Ink - Gathered Twigs.
A Sizzix Decorative Strip Sizzlit die was used to cut the rosettes using scraps of papers from the Ubud Dreams and Keepsake collections. Letter stickers were from the Base Coat collection. The ruler sticker is from Factory 42 collection.

The feathers were die cut from vellum with Memory Box dies.
In addition buttons, jute twine and an owl charm were used to complete the layout.

Thanks for looking.
Lynn x

Monday 27 August 2018

Farm Life - Wroxham Barns

I saw and loved a layout class on facebook designed and advertised by Clair Matthews of www.cs-getcrafty.com  As I couldn't get to the class, I contacted Clair and asked if I could purchase the kit, which she arranged for me. This weekend I found time to put the kit together.

I used some photos taken in 1994 when we took our three, two year olds on a day trip to Wroxham Barns where they enjoyed the children's farm area.


The luxurious papers for this layout are all from the 'Farm Life' collection from Mintay Papers by Karola Witczak. The papers are very thick and have some beautiful designs.


So lots of fussy cutting, distressing and inking, and the above picture shows what I made. I stuck closely to the instructions for this page, a few minor changes only. I added Stickles to the wings of the butterflies and the bee. I have plenty of images and paper left over to make some cards or another layout if I add some more papers.

Thanks Clair, really pleased with the result.
Thanks for looking.
Lynn x
Sunday 26 August 2018

Relax - Papermaze August Kit

My second layout using the kit from Papermaze for the month of August is called 'Relax'. I selected the blues and greens from the bright, summery colours of this kit for this layout.  The layout features two photographs of my son, some years ago enjoying the hammock we set up in the garden between the trees.


The August Kit
... And here is the Pagemap sketch I chose to work from.


I chose waterfall Bazzill as the base for this layout. I cut a strip of Tidepool which I then cut in half diagonally. These pieces were randomly stamped with the Woodware circle stamps and placed either side of the layout and trimmed with pale blue ric-rac from my stash. 

Using the Tidepool paper again, but with the wording side uppermost, I cut a pieceto place placed in the centre of the page. Then I trimmed a piece from the stripe side of Life is Good paper, selecting the blue and green area, I shaped this into a banner at the bottom. 

With one of the Amy Tangerine Resist Watercolour Tags supplied, I created an ombre effect by blending several shades of distress ink across the length of the tag. Then I tied a scrap of jute twine to the tag.

Finally I used two leaf dies from a Sizzix Thinlits set called Intricate Native Florals and with some white scrap card I made three clusters of three leaves.

Back with more early next month. with two more layouts from this kit.
Thanks for looking
Lynn x

Saturday 25 August 2018

Our Beautiful Baby Girl

Today I would like to share a layout I made with this photo of my daughter Catherine, just before her Christening in 1992. I made the layout at the beginning of August and have only just managed to share it with you.


When I saw the Gypsy Rose papers I just loved the designs and colours of this collection and so selected a few sheets to make a few layouts. 

I used both sides of the sheet called 'Quirky'. I cut athe sheet into three pieces 1" x 12", 2" x 12" and 9" x 12". These were stuck vertically to a spare sheet of 12" x 12" cardstock. First the wood effect side of the paper (1" strip) to the left, then the pink and white patterned side (2" strip) then finally the wood effect paper again (9") piece. 

I ran a strip of lace along the right side edge of the patterned paper. 

I cut two frames from the Kaisercraft Full Bloom collection 'Frame Cluster', these were distressed and inked with Aged Mahogany Distress Ink. Then I cut each of them into two pieces and arranged them on the layout with the photo until I was happy with the positions. The frames were stuck down directly to the background, but the photo was raised on foam tape. 

Next I did some fussy cutting selecting three flower clusters from Gypsy Rose 'Inspiring' paper. These were also raised up with foam tape. I punched fern leaves with a Martha Stewart punch from 'Wonderlust' paper, and inked them with Peeled Paint Distress Ink.

For the title I cut the word 'Beautiful' from the same green wonderlust paper with a die from the Sizzix Tim Holtz Alterations Thinlits Die Set - Handwritten Love. The other words were some old white Basic Grey letter stickers, which I inked with Aged Mahogany Distress Ink. The die from

Finally I added a little sparkle with some crystal Stickles, to the leaves and the lace. 

I enjoyed working with these gourgous papers. 
Thanks for looking.
Lynn x

Friday 24 August 2018

Run Or Dye - Papermaze August Kit

Here is my layout using the the latest kit from Papermaze. This one has bright, summery colours for the month of August. The layout is called 'Run or Dye' using two photos of my nephew's family when they took part in the 5K charity run.


What's in the kit this time? Please see the kit on the shop website and my post on the Papermaze Blog.


The August Kit
For this layout I started off with a sketch for inspiration from Page Maps


I used: Blush Red Medium Bazzill to make a border and a photo mat. 
Using my Cricut, I cut my title onto the Avalanche Bazzill and then trimmed and mounted it onto the red.
I added some flicks of Distress Stain to the card using a to selection of colours to match the papers. The edges were inked with Evergreen Bough Distress Ink.

I trimmed the manufacturer's strip .from the Tidepool paper, then used it to trim the left side of the Avalanche cardstock


To give a rainbow effect to the letters, I used the colourful stripe side of the Life is Good paper, this was stuck behind the cutout letters, then I added back in the letter centres to the R, D, and O's.

I made a journalling panel by cutting out and gutting one of the 4x6 Elements and backing it with the cloud patterned paper from the reverse side of this sheet. I added two words from the soup labels sticker sheet from the kit. Finally I added a little more colour to the background with Nuvo Crystal Drops in a selection of colours. 

Back with my next layout soon
Thanks for looking
Lynn x

Tuesday 7 August 2018

Happy 50th Birthday Robert

Having a catching up session over the next few days with some of the cards I have mnade during the year.

My brother celebrated his 50th birthday back in June and we all enjoyed a meal and cake at The Grasshopper Inn in Westerham. 


I made a card the the colours of West Ham using Bazzill Basics cardstock. All the dies I used were from Crafter's Companion. An accordian card, numbers overlays and others. 

I used Liquid Pearls and Stickles to embellish the card.


The reverse of the card
Happy 50th birthday Rob.


We had a good day all together. Sorry for the delay in sharing the card.

Thanks for looking.
Lynn x

Monday 6 August 2018

About the Author

Back again with the fourth of my layouts from the July Papermaze Kit. Again I have used the using the exclusive stencil included in the kit. The other pages I created with this kit can be found here.


This layout was created with a photo of my brother with the football books he has written and had published. The photo was taken in preparation for the next publication 'Irrational Hatred of Everything' which will be published later this year. The photo is for the 'About the Author' page. 


I trimmed the Rain cardstock down to 11.5" x 11.5" then with Stormy Sky Distress Ink and the stencil I worked my way round the edges of the cardstock, varying the depth of the image as I went.

This was then mounted onto a gutted sheet of Typhoon*cardstock. From the leftover patterned papers I cut lots of strips about 1.5cm x 13.5 cm, some of these were cut in to arrows, all were inked with the Stormy Sky ink. I then die cut additional arrows with the Little B arrow die set. Together with two strips of Washi Tape from the kit I arranged these down the centre of the page. 

The photo was mounted onto a scrap of Boogieboard cardstock and placed it near the top left of the layout. My title was created with some letter stickers from my stash. 

Finally I used the Pretty Little Studio leaf die-cuts to create clusters in tow corners.

I will be back later in the month with some ideas for the August kit.
Thanks for looking. 
Lynn x 

Sunday 5 August 2018

Paris - Papermaze July Kit

Here is the third layout I made using the July Papermaze Kit.

For details of the kit content please follow the link above to the shop and for details of all four layouts I made using the kit see the Papermaze Blog here and here. Both these layouts were created with the exclusive chevron stencil included in the kit.

The first page features a photo of my daughter and her fiancé George, on a recent holiday to Paris.


To make the layout I used the Splash Bazzill as a base, and then cut the Panelling paper into strips along the darker lines. I distressed the edges and inked them with Hickory Smoke Distress Ink. Then I rearranged them and stuck them to the cardstock.

Using the chevron stencil I lightly inked the pattern onto the panels with the Hickory Smoke ink.

I die cut stars and a tag from white Bazzill and inked the edges. The mat for the photo was cut from the Sand Dollars paper. A quote was added to the tag, this was cut from the manufacturer's strip on the bottom of the Wandering Ivy paper. I added some twine from my stash.
 

The chipboard word circle was inked with Candied Apple Distress Oxide Ink to match the twine. The title was cut from scraps of Typhoon cardstock. Both the circle and the title were coated with Diamond glaze to give it a shine.


The arrow clip was stuck to the top of the photo. Finally I added some gems from my stash.

Thanks for looking.

Lynn x