h3.post-title font-family: 'Bad Script', cursive

Monday 31 December 2012

Scrapbook Christmas Gift for Sylvie

Over the course of several years I have made various scrapbook pages of my sister, from her Christening in 1962 to her 50th birthday this year. I put the first 20 of these in an album for her for Christmas.

This was made at Gloucester2 Scrappers Unlimited Retreat in 2006.
Mum with baby Sylvie at home after her Christening.

This double page layout was an early Scrapaholix kit.

This is a LO created using the Mojo Holder for inspiration.
My sister with her Godmother Auntie Sylvia.

A recent Papermaze crop kit designed by Lou Collins.
My sister with her Godmother again.

A layout made in 2009, my sister at Crystal Palace Children's Zoo.

My sister and me in our matching dresses, we called sweetie Dresses because of the design on the fabric. At home in our back garden.

A layout made with Scenic Route papers at a Scrapaholix Retreat.
My sister on holiday Woolacombe 1965.

Sylvie on the same holiday in her knitted swimsuit!

A page I designed for the Crafty Pastimes Crop several years ago.
Sylvie in the sand dunes.


Love this photo of Sylvie with Mum's deckchair, sunglasses and paperback upside down!

A DLO designed by Shimelle, and created in one of her classes.
Various photos from a holiday.

Me and Sylvia - think this was a scraplift from a magazine but I can't remember who the designer is.


Christmas dinner 1964

A page I did as a challenge at a Crafty Pastimes Crop - I won a voucher towards Gloucester2 retreat.
My sister and me with our cat, Caligula.

Sylvie and Bob's Wedding in 1980

Another layout made at a Scrapoholix retreat, designed by Dawn Inskip.


Scrapaholix kit agian
Mum and Sylvie at Mum and Dad's 50th Wedding anniversary party 2007.

My recent layout created for a CSI challenge.
Sylvie on her 50th birthday.

Sylvie was thrilled with the album.
Thanks for looking
Lynn x

Sunday 30 December 2012

Aprons and Bags

I have been busy making a few more of my aprons and scrapbookers bin bags. Some were gifts and others were commissioned.

We had Elaine's which I was asked to make in the colours of the Brazilian flag.


Rainbow colours for Heather

One for Shirley 

Blues for quilter Beryl with patchwork / sewing themed fabrics tape measure webbing tape. 

Marion's loves purple 

I made Barbara's in lemons and oranges, I had to make to make the font smaller so made some templates with the Cricut.

Four more bin bags 

Two more aprons nearly finished too!

Thanks for looking

Lynn x

Saturday 29 December 2012

Bags of Fun!

Following on from making Aprons with calico and applique I decided to make shoe bags for several smaller friends for Christmas. The idea being they would contain their Christmas gift, and double as a show bag.

Catherine wanted something special to contain a gift for 18 month old Annabell, I thought it would be useful as a shoe bag when she is a bit older.


The triplets are nearly four now have started nursery so I made them one each.


Off to nursery -

Thanks for looking.
Lynn x

Wednesday 26 December 2012

A Canvas for Dylan and Daisy

My sister asked me to make a canvas each for her friend Geraldine's children Dylan and Daisy.
Here is what I came up with. I started with two 12" x 10" canvases, and painted them ivory, when dry I inked the edges.


They both use papers from the same four collections, The Farm House Company, Basic Grey Basics, Scenic Route and Simple Stories Bingo Cards.
 

I made a group of three pinwheels on Daisy's canvas and three rosettes on Dylan's. The pinwheels were cut using the Cricut and the 3D Pinwheel Cartridge. The rosettes were cut by hand using various widths of 12" strips. I tied each button with coloured twine.


I varied the sizes and double sided patterned papers. I added brads to the centre of each pinwheel and buttons to the rosettes. 


I cut both names using the Cricut and the Storybook cartridge with a shadow, then I glossed the letters with Glossy Accents.


I added a charm with blue twine to the base of Daisy's photo...


...and a Micky Mouse paperclip with bunting for Dylan.
The bunting was made with chipboard flags covered with paper and inked. they were joined with red twine.


 I added a spiral heart paperclip to Daisy's canvas. 
There is also some tiny scraps of Kaiser Crafts Sweet Nothings paper here, edged with a Martha Stewart punch and as a mat for the photo. 

This also shows the bingo card from Simple Stories.


I added a tiny pair of chipboard Wellies to Daisy's canvas painted and inked.


I hope my sister, her friend and Daisy and Dylan like the canvas Christmas gifts. 
I had fun making them.
Thanks for Looking.
Lynn x


Thursday 20 December 2012

December Crop Kit - Christingle


My son Andrew after the Christingle service outside St. Paulinus Church in Crayford. For several Christmases my three children loved to dress up to take part in the service. This particular photograph was taken in 1997. In fact this was one of my daughter Emily's memories in the Advent letters she is sending me, she remembers the first Christingle they attended when they were three. I snowed that weekend and so the photos taken in the graveyard were very atmospheric. I  have scrapped the photo with all three of them on that first year which I believe was 1995 several times, it has to be my favourite photo, her is is in black and white.


Back to the layout with Andrew the five year old shepherd! I went to the Paper Maze crop on Saturday and this month the kit was designed for us to create our own design. The kit contained beautiful three papers from Carta Bella's Christmas Day Collection - fast becoming a favourite line of papers of mine. The kit also contained two sheets of Bazzill, one in a deep, dark red and a white. There was ribbon, dew drops, gems, leaves, kraft tag, star beads, chipboard 'Merry Christmas' holly leaf ribbon and a Christmas rose.

In fact I still have all this to play with after making my layout, so I can easily make at least one more layout or several cards.


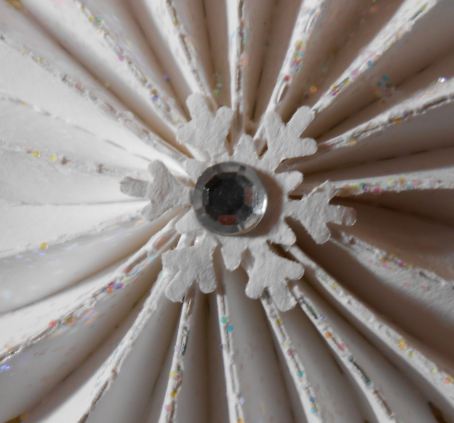
Vanessa had some dies, punches, embossing folders etc. all with a Christmas theme for us to use. I picked the Tim Holtz Alternation Sizzlets Strip - Snowflake Rosette Die.Which makes an assembled snowflake of approximately 3 1/2". I set about trying out this die and it wasn't as easy as it looks, but I mastered it in the end! I used 12" x 2" strips of the white Bazzill and ended up buying another sheet as I made a few errors (it really needs an extended spacer platform to cut evenly throughout the die) and needed some to mat my photo. 

In the end this is the method I found worked best.


1. Cut a snowflake from the strip of Bazzill.


2. Press the shapes out from the card, you end up with a small snowflake and the accordion shape.


3. Poke out the tiny diamond shapes that give the snowflake its pattern.


4. Accordion fold the long shape, I made mountain folds over the longer points.


5. Join the ends with some wet glue - It looks a bit like a very wide crown at this point!


6. I thought it would be a good idea to have a base to stick the rosette to and was going to cut some circles from scrap, but had a small pile of the snowflakes from the same die that I didn't plan to use so I added wet glue to the centre for the flat snowflake and arranged the accordion snowflake over this, it's tricky but you need to hold it in place for a few minutes until it's firmly held in place.


At this point it looks like this.


This is how it looks on the back. As I couldn't see what I was doing from the front, it is a bit off set, but it's not going to be seen so it's not a problem. If I was sticking this to the front this would be centered.


I used a snowflake from a Martha Stewart corner punch to cover the centre hole of my snowflakes, then added a flat backed pearl from the kit.


Then I added lots of glitter with my Ice Stickles. I repeated this five times to add a row of snowflakes across the layout, staggering them across the page above the reverse side of a piece of Carta Bella - Christmas Day - Ornaments cut to about 4" x 11 1/2", with the bottom corners rounded and the whole piece inked around the edges.


For the sixth snowflake which is at the top of the layout, I added a snowflake from the die and decorated this with flat backed gems from my stash. 

I would also like to try this die for the mini snowflake rosette- which is also available at Paper Maze 


I added my journalling to the tag in the kit and tied the string ties into a bow. 
I added the five glittery, red bead stars along the bottom panel along with the chipboard greeting. I painted the greeting with acrylic paint and then stained the letters with brown ink and the holly with red and green ink.

Thanks for looking.
Lynn x