In fact I still have all this to play with after making my layout, so I can easily make at least one more layout or several cards.
Vanessa had some dies, punches, embossing folders etc. all with a Christmas theme for us to use. I picked the Tim Holtz Alternation Sizzlets Strip - Snowflake Rosette Die.Which makes an assembled snowflake of approximately 3 1/2". I set about trying out this die and it wasn't as easy as it looks, but I mastered it in the end! I used 12" x 2" strips of the white Bazzill and ended up buying another sheet as I made a few errors (it really needs an extended spacer platform to cut evenly throughout the die) and needed some to mat my photo.
In the end this is the method I found worked best.
1. Cut a snowflake from the strip of Bazzill.
2. Press the shapes out from the card, you end up with a small snowflake and the accordion shape.
3. Poke out the tiny diamond shapes that give the snowflake its pattern.
4. Accordion fold the long shape, I made mountain folds over the longer points.
5. Join the ends with some wet glue - It looks a bit like a very wide crown at this point!
6. I thought it would be a good idea to have a base to stick the rosette to and was going to cut some circles from scrap, but had a small pile of the snowflakes from the same die that I didn't plan to use so I added wet glue to the centre for the flat snowflake and arranged the accordion snowflake over this, it's tricky but you need to hold it in place for a few minutes until it's firmly held in place.
At this point it looks like this.
This is how it looks on the back. As I couldn't see what I was doing from the front, it is a bit off set, but it's not going to be seen so it's not a problem. If I was sticking this to the front this would be centered.
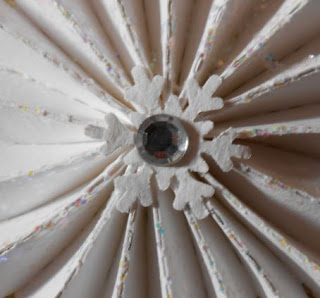
I used a snowflake from a Martha Stewart corner punch to cover the centre hole of my snowflakes, then added a flat backed pearl from the kit.
Then I added lots of glitter with my Ice Stickles. I repeated this five times to add a row of snowflakes across the layout, staggering them across the page above the reverse side of a piece of Carta Bella - Christmas Day - Ornaments cut to about 4" x 11 1/2", with the bottom corners rounded and the whole piece inked around the edges.
For the sixth snowflake which is at the top of the layout, I added a snowflake from the die and decorated this with flat backed gems from my stash.
I would also like to try this die for the mini snowflake rosette- which is also available at Paper Maze
I added my journalling to the tag in the kit and tied the string ties into a bow.
I added the five glittery, red bead stars along the bottom panel along with the chipboard greeting. I painted the greeting with acrylic paint and then stained the letters with brown ink and the holly with red and green ink.
Thanks for looking.
Lynn x
Lynn x


Oh Lynn! This is absolutely STUNNING! Those snowflakes are just absolutely gorgeous. Love the photo too and have always loved the photo of the 3 of them since I first saw it....so precious! Beautiful work as always HUn xxx Merry Christmas! xxxx
ReplyDeleteAdorable photos Lynn...you make the snowflakes look easy !!
ReplyDeleteKaren x
Thanks Anita and Karen. x
ReplyDelete