h3.post-title font-family: 'Bad Script', cursive

Wednesday 30 January 2019

Distress Oxide Ink Blending Combos - Week 1

I have seen and been impressed by a few people sharing their results from this project, so followed their links to Kristina Werner's blog to find out more about it. You will find details and a video there to inspire. I decided to join in the fun, making the four colour combos for this week. 


I plan to make my samples into cards so have made them big enough to do this. I have treated them all with different techniques. I used Distress Oxide Inks, Mini Round Blending Tools and foam pads all purchased from Papermaze. I purchased the Neenah Classic Crest Solar White from Crafter's Companion.

Oxide Combo 1 - Scattered Straw, Worn Lipstick & Festive Berries


The blended card was cut with a Sizzix stacked Postage Thinlits die and the balloons were cut with dies from Crafter's Companion. The greeting stamps is from Woodware.


I used an Echo Park stencil and a baby wipe to lift colour off the card after blending.

Oxide Combo 2 - Dried Marigold, Ripe Persimmon & Fired Brick


I treated this blended card with a Tim Holtz Layering Stencil and some Translucent Texture Paste. It was cut with a Sizzix Stacked Deckle die. The greeting is an Avery Elle stamp.


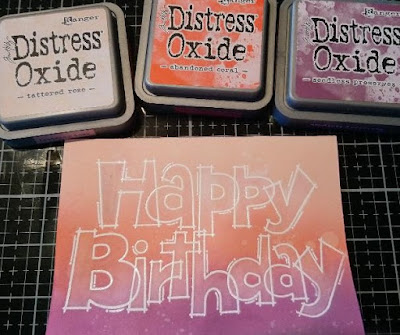
Oxide Combo 3 - Tattered Rose, Abandoned Coral & Seedless Preserves


Before Blending I used a Woodware stamp and Versamark Ink with White embossing powder.
I lifted ink from inside the stamped image with a brush and water.


Oxide Combo 4 - Spun Sugar, Picked Raspberry & Wilted Violet


Once blended I stamped with Versamark and black embossing powder, using another Woodware stamp. The greeting stamp is from Avery Elle. Trimmed with a Sizzix stitched stacked die.


Looking forward to next week's colour combinations.
Thanks for looking
Lynn x
Sunday 27 January 2019

Naughty or Nice - CSI #271

My response of the CSI Cold Case 271 (Colour, Stories, Inspiration), is this layout called 'Naughty or Nice?' with my nephew's children the Christmas before last. 


In answer to some of the clues:
Find older papers that have a winter theme / match the palate - I used papers from several old Basic Grey collections:
Blitzen, Figgy Pudding, Eskimo Kisses, Pulmeria, Wassail and Fruit Cake.
Use at least 3 seldom used stamps - managed one with 49 and Market Gabi's Stitches
Use Stickers - Letter Stickers from the Basic Grey Collections mentioned above.
Use Enamel Accents, Liquid Pearls or similar to make dots around the page inspired by the white dots in the scene - I used Nvuo Crystal Drops around the large heart and on two of the paper strips.
I also used paper with dots for the background.
Use products from a kit you have not used or that you did not use much - several items from a Christmas Papermaze kit form a couple of years ago - the Christmas greeting, the glitter heart and the tickets. I have a box of Christmas embellishments which I have collected over the years and that is where I found some wooden gingerbread men, a button badge, silver painted wooden stars, Santa charm a glittery brad and a Christmas postage stamp.

Create a wreath from some of the items - I made a heart wreath from my papers using an old set of templates from my stash - They were from Technique Tuesday.
Update the look of your items by adding stitching - my rubber stamp as mentioned above - stitches.

Thanks for the challenge and for looking.
Lynn x

Tuesday 22 January 2019

Abbey Road

I'm back today with another layout created for my brother's album. This one marks his love of the Beatles, and I used one of the photo taken when he crossed the legendary Abbey Road.


I used a papers from some older collections of papers by Kaisercraft.
Sheet music from the Timeless collection
Apothecary from the Anthology collection
Wood and brick effect papers are from the Basecoat IV collection
The black and white stripes to reflect the zebra crossing is Eternal is from the Always and Forever collection.
The rub-ons for the title and date are both from different sets by Making Memories.
The record stickers are from the In the Attic collection.

Thanks for looking.
Lynn x

Monday 21 January 2019

Happy Birthday Teenager!

I wanted to make a card for Jessica's 13th birthday, and I was inspired by the Basic Grey Fresh Cut papers I had on my desk from completing a layout for Scarlett's Birthday layout.


For the card I took a white card blank and using patterned papers, cut three different sized deckle edges rectangles using a set of Tim Holtz Sizzix Thinlits dies. I inked all the edges with Black Soot Distress ink. The greeting was stamped with Archival ink and Avery Elle Clear Stamp (Sentimental Too), across the largest rectangle.

The rectangles were stuck in lace on the card, then I flicked Black Ink using a Dylusions Spray.

Using the Sizzix dies from the detailed butterflies thinlits set, I cut a Base butterfly from patterned paper and a matching detailed butterfly from Black cardstock. I built these up on the card using 3D foam pads, adding antenna in the form of black stamen.

I added two words using the letter stickers from the Fresh Cut collection. The large number was cut with some dies from Crafter's Companion.

I still had some left over papers from the collection, so continued making cards in the same way to add to my stock. I used up all the sheets of paper from the collection that had already been cut into. A good bit of stash busting!!


Hope you had a lovely birthday Jess.
Thanks for looking.
Lynn x

Saturday 19 January 2019

Graduation Congrats.

My brother graduated from the South Bank University with a degree in Estate Management. Here is another layout I made for the album I gave him for Christmas.


The background is a sheet of Gallant from the Mister Fox collection. Then the coloured blocks of paper are from several different collections. The title is made from foam Thickers. I added some old Joulee's Boutique stickers and journelled on some paper scraps.


Thanks for looking.
Lynn x

Friday 18 January 2019

Super 8

I wanted to create a layout for my brother Robert's album to tell the story of the cine camera he found in an antique shop recently. It is exactly the same as the one my father had when we were children. Robert had all the films Dad had taken digitalised a few years ago making them much easier for us all to view. Sadly it's now very difficult and costly to get the 8mm film developed, and he ended up sending away to Hollywood to have his first film developed last year.


For this layout I used several papers from Kaisercraft's Blue Bay collection. Baltic was used for the background, with Placid and Shimmer for the layering.  The paper for the photo mount was from Kaisercraft's Always and Forever collection - Devotion and Promise. I used acetate film strips fro Kaisercraft's Keepsake collection. I also used some Blue Bay Stickers.

The Picture Wheel die is a Sizzix one from Tim Holtz, and I made the tag from a scrap of Kraft Bazzill. The rubons for the title and the date are from two different packs by Autumn Leaves. 


finally I added a selection of embellishments from my stash, including a charm, Nuvo Crystal Drops, a button badge and dew drops.

Thanks for looking.
Lynn x

Thursday 17 January 2019

Happy First Birthday Scarlett - CSI 269

It's some time since I took part in one of the CSI (Colour, Stories, Inspiration) scrapbooking challenges, but I thought I would give it a go this time. I wanted to create a page for Scarlett's album for her first birthday. The birthday theme fits with CSI's 7th birthday.
 

Scarlett Rose

 Here are the details for solving the challenge,   for more details please see the blog:


For my layout I used an old collection from Basic Grey - Fresh Cut, the colours were ideal for the scheme, and I'm pleased to have used some papers from my stash. I inked the edges with Hickory Smoke Distress Ink.

Instead of polka dots my main paper has a tear/rain drop design on it - Bluebell Boutique paper.
I used many papers from the collection to make two large rings and three two-layered squares. I cut these using the Cricut. Then using some Crafter's Companion dies I cut the balloons, bunting and the large number '1'.

I selected a white doily from my stash and some flat-backed self-adhesive pearls. My balloons were tied with Baker's Twine in several different colours. With a small square of paper from a Basic Grey paper pad (Basics) I cut a journalling panel and edged it with an EK Success notebook punch. I used some 3D double-sided foam pads to vary the height of the elements.

I added some words with tiny mint letter stickers from the Fresh Cut sticker sheet.

Thanks for looking.
Lynn x

Wednesday 16 January 2019

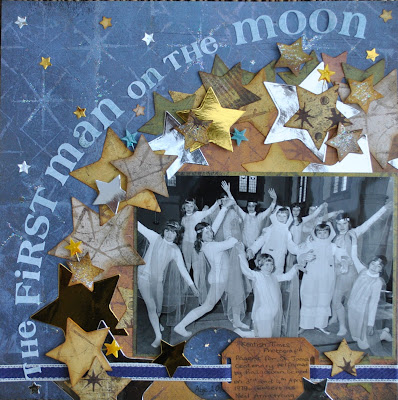
First Man on the Moon


Another layout I made for my brother's scrapbook, this time I featured a photograph taken by the local newspaper. Robert played the part of Neil Armstrong in the pageant to celebrate our church's centenary.


Image result for Basic Grey Hang 10 collectionI was rummaging around looking for some papers suitable for this page when I found the remains of my Hang 10 collection from Basic Grey. It's always good when you can use some old papers you already have in your stash. In addition to a sheet of Slash for the background, all the rest was from scraps of Lulu, Pearl, Stoked, Swell and Rip. The moon was cut from a piece of Carve. I also used a couple of the die cut tag shapes from the collection threaded through with some blue tape. The stars were cut using every star shape die I have, some from paper and others using mirror card in both gold and silver.

The title was created with Basic Grey Stickers from the Oh Baby - Boy collection.

Thanks for looking.
Lynn x

Tuesday 15 January 2019

When Scarlett Met Santa

Here is an extra layout I made over on the Scrap Paper Scissors Blog for Papermaze during the Christmas break.

My great niece was not impressed with Santa, at 13 months on a trip to see him she showed her displeasure!  I was inspired to create this layout seeing some of the Doodlebug Designs Inc. layouts shared on Pinterest. As I had stickers leftover from the advent calendar I made I thought I would give it ago. It was quite straightforward once I got my template for the heart cut to the shape and size I wanted.

When Scarlett Met Santa


I used some of my older papers and stickers by Doodlebug Design Inc. For the frame I gutted a piece from the centre of 'Dear Santa' from the Milk and Cookies collection.

I trimmed a piece of Avalanche Bazzill to 11" x 11" and inked the edges with Festive Berries Distress Ink. This was glued in place centrally over the frame.

From a piece of 12" x 12" scrapbook paper I didn't want to use I cut myself a large heart shape, once happy with the size and shape I drew round it lightly with pencil. I mounted my photo onto a piece of patterned paper from the same collection and stick in place on the layout. I then set about lining up the lettering and used various letter stickers to do this. They are also all from Doodlebug Designs Inc.

I arranged the stickers from several Christmas collections around the heart shape, overlapping the pencil line and making sure I kept the same true. I carefully rubbed out any pencil marks still showing.
Finally I added the year at the bottom of the page.

Thanks for looking
Lynn x

Monday 14 January 2019

Happy Birthday x 3

It's amazing to realise that our niece's triplets will be 10 years old today. Happy birthday to Oliver, Hannah and Lucy.


I few months ago I experimented with watercolour papers, Distress Oxide Inks, Crafter's Companion Dies and Echo Park Stencils and made a few cards. I was pleased with the bright, cheery results and decided to make some more, varying the colours to make a card for each of the children.


I used:
Echo Park Wish Upon A Star - 6" x 6" Make A Wish Stencil
Echo Park Party Time - 6" x 6" Birthday Candles Stencil
Distress Oxide Ink Pads
Baker's Twine in various colours to match each card.
Die'sire Classiques 1" Alphabet Dies - Contemporary Uppercase Die Set
The balloons, and Happy Birthday Banners are from an older Crafter's Companion set.
Watercolour paper
6" x 6" white card blanks.


Happy Birthday Oliver, Lucy and Hannah.
Thanks for looking.
Lynn x

Saturday 12 January 2019

Wedding Invitations and Table Settings

I made some invitations and other items at the request of my nephew Mark, and his fiancée Kerry-Ann. I can't believe I have not already shared these with you all as they were finished a while ago and the wedding was in September.

Invitations ready for the happy couple
 

The invitations were made with an SVG file I downloaded from Etsy. The Bazzill Bling cardstock Kerry chose was a deep purple with a bit of a sparkle. The design included a pocket allowing us to include removable information including RSVP, gift and accommodation cards. The invitation was tied up with white organza ribbon.


The couple are keen on horse racing and so the place setting cards were made in the shape of a running horse with each name written onto it. I found a horse image and made my own place card on the Cricut Design Space then used the print and cut feature to create the cards.

Kerry-Ann and Mark also wanted some tags to thank their guests, these were made in the same way. I added some deep purple organza ribbon bows and a length of Baker's Twine so the tags could be tied to the napkins. 


Each table was named after a famous racehorse, so I made A5 labels for each table, with the name of the racehorse on one side and photos of the bride and groom at various ages on the other. 


I typed and printed the menus onto vellum.


Kerry and Mark purchased a betting slip for each guest for a race taking place on the day, they were tucked into these little folders titled 'Eat, drink and be lucky'.


Kerry purchased a large mirror for her table plan.


We all had a lovely day, congratulations to Mark and Kerry.
Thanks for looking.
Lynn x


Wednesday 9 January 2019

Happy Wedding Day


I was asked to make a wedding card for a pink colour schemed wedding. This is what I came up with. 


The image is from Lili of the Valley and the background paper is from Crafter's Companion. I cut the image and the mats are cut using a stacking set of dies from Sizzix. The greeting dies are also from Crafter's Companion. The words were cut from pink and and coated with Glossy Accents.

I used a selection of flowers from Wild Orchid Crafts, and the leaves were cut from scraps of paper with a Martha Stewart punch. finally I added dots of Nuvo Crystal drops in pink, white and silver.

Thanks for looking.
Lynn x

Saturday 5 January 2019

Christmas Pudding Hats

My final layout using the December 2018 Papermaze kit. Together with the kit content I used some gingham fabric, which I tore into strips. It shows a photo of my three wearing the Christmas pudding has I made for them.


More details on how this was made can be found on the Papermaze Blog.

Thanks for looking.
Lynn x

Friday 4 January 2019

Christingle

Here is another of the layouts I made for the Papermaze December kit. This one has a photo of my children after the Christingle Service in 1995 when they were 3 years old. 


I used the Snowcapped paper from Kaisercraft which was in the kit. For more information please see the Papermaze Blog.

Thanks for looking.
Lynn x

Wednesday 2 January 2019

Precious Baby Boy

At Christmas I gave my brother the album I have been working on for some years. There were a few new layouts included, which I have not yet shared on the blog. Here is the first of them. 


I had my Doodlebug Designs papers out as I was making Christmas layouts and found these papers. I remembered saving them for baby the purpose of scraplifting a layout I had seen on Scrapbook.com by Melinda Spinks back in 2012. Mine turned out quite different but I liked Melinda's original idea and took it from there with different papers.

I used: Papers and stickers from Doodlebug Designs Inc.
Various dew drops, gems, sequins and enamel dots
Bazzill Jut The Edge cardstock strips.


Thanks for looking.
Lynn x


Tuesday 1 January 2019

Save The Date - Christmas Cards

 Catherine and George have arranged their wedding for 28th July next year. As it is earlier than they first planned, they wanted to send out save the date cards. As it was also time to prepare Christmas cards, they decided to combine the two. Catherine and I worked on the cards and managed to get them out early in December.


 We had a lot to make so once we had our design sorted out we set up a production line!


I used Bazzill in various shades of pink and turquoise
miri card
Crafter's Companion greeting die
Sizzix Thinlit set - Phrases, Thank you and Flamingo
5" x 5" white card blanks
Nuvo Crystal Drops Simply White Gloss


Lots of fiddly sticking, but we got there in the end.
Thanks for looking.
Lynn x