h3.post-title font-family: 'Bad Script', cursive

Friday 16 November 2012

Daisy Birthday Girl


For the November card challenge over at Scrapology I chose this image by the lovely Megan K. Suarez from Dilly Bean stamps, who is sponsoring the challenge this month - Please see her blog HERE.
The challenge is to use buttons and bows.

I coloured her with my Promarkers and used Doodlebug Design papers in these fresh yellow, blue and green colours. The wide organza ribbon is tied in a bow to the right and decorated with some buttons. The daisies were stamped a second time and cut out to add to the corner of the patterned papers.
I added a flat backed pearls to the centre of each daisy.

Thanks for looking and please pop over to Scrapology (link in side bar) of you want to find out more about this challenge and winning your choice of some of these delightful images.

Lynn x

Tuesday 13 November 2012

Happy Birthday Amanda!

I made this card for Amanda's birthday, she was away  for her birthday, but I made her a card which was waiting for her on her return.


The stamp is a digital one from Dilly Bean stamps,  

I also used:
Doodlebug Design papers and letter stickers
Glittery cardstock in Bubblegum Pink
8" x 8" card blank
ribbon
Liquid Pearls
SU Punches for greeting
Ranger Distress Ink pad
Promarkers
Stickles
Glossy accents (over eyes)

I'm entering this card into the I love Promarkers Challenge for this week - Pretty In Pink

Hope you had a great birthday in Africa Amanda.

Lynn x

Saturday 10 November 2012

Lacock Village


Following on from yesterday's blog post about Lacock Abbey, here are some photos taken in the Village. Shame it was such a wet day, but it is a fascinating place.


Thanks for looking. x

Friday 9 November 2012

Lacock Abbey

While in Gloucestershire last month, staying with Alan's cousin we visited Lacock Village and the Abbey, which is owned by The National Trust.


Lacock is set in rural Wiltshire, the village is famous for its historic streets and buildings and more recently as a TV and film location. Harry Potter, Moll Flanders and many other productions were filmed here.
The Abbey, has it's own woodland grounds, it is a country house of various styles, built upon the foundations of a former nunnery. We visited the medieval rooms and the cloister court. We didn't have time to look at the museum as well, but it would be good to return another time visit that part of the experience as well. (The museum celebrates the achievements of former Lacock resident, William Henry Fox Talbot, famous for his contributions to the invention of photography.)
Here are some pictures taken at the Abbey - This blog entry is Photo heavy - you have been warned!!!


Thanks for looking, will be back with some photos of the Village.

Lynn x

Wednesday 7 November 2012

Anything Girl

The lovely Sue - SooJay, who is on our Scrapology Design Team introduced me to the Dilly Beans Digital Stamps  and I was inspired to have a go at this weeks challenge - Anything Girl and made this Christmas Card (getting on well with the Christmas cards now).


Using this Holly Girl Framed Image - I love her eyes, I coloured them with the Promarkers and glazed them with Glossy Accents. The Roses are gently coloured with Promarkers in pale shade and then covered in crystal Stickles


I used:
Papers are from the Basic Grey Mistletoe and Pear 12" x 12" pad.
Paper doily
Lace
Black Ribbon
Red button
Bakers Twine
Stickles
Promarkers
Kraft card  blank
Stampin' Up Oval punches-  Not sure what make the greeting stamp is.
Dilly Beans - Holly Girl Framed Image.

Tuesday 6 November 2012

Snow is Falling!

I made Christmas Cards at the Bramford Crop, I was sitting with Karen, sharing our stamps pens and dies - thanks Karen x. It was lovely to go along to a new crop and meet some old friends and make new ones too. 


I need to replace this photo the frame looks wonky!!

This card features papers by Doodlebug Design, and Echo Park
Lots of distressing inks, Liquid Pearls and Stickles all by Ranger
Bazzill Bling
Memory Box corner die, Sizzix frame Die
Promarkers
Lili of the Valley Snow Queen stamp and greeting stamp.
Circle punches by Woodware and Stampin' Up
Lots of flat-backed pearls and gems


So here is a Christmas card for the Lili of the Valley challenge for this week.

Monday 5 November 2012


Scrapology are holding a raffle, to raise money for ChYps and the prize is:


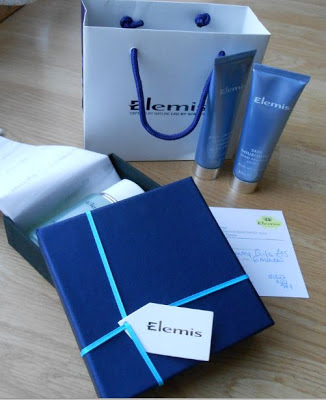
An Elemis Facial Voucher worth £45.00 for the Elemis SpaPod at John Lewis, Bluewater in Kent.

It would make a lovely gift or treat for yourself.

As you can see from the picture it comes in a beautiful gift box and bag along with three sample products. We will have tickets available at the club if you are interested.

The tickets are £1.00 each the draw will take place later this month.

If you would like to purchase ticket/s please comment below or contact me HERE.

Thanks for looking and hope to hear from you soon. 
Lynn and Linda x

Sunday 4 November 2012

Giddy Up!

A photo from before my son Andrew started school. We were members of the local Twins Club and attended a summer fair they held in the grounds of a primary school. (The school Andrew was about to join for the next seven years). I guess the year was 1996 and Andrew would have been 4 1/2 years old. He had his first ride on a horse which he loved at the time, but. I don't think he has ever repeated the experience!


I created this layout from a class kit designed by the talented Janina

The kit contained a sheet of Kraft Cardstock from the 12 x 12 stack by Tim Holtz Idea-ology Kraft Resist Paper Stash Cardstock, with the intention of using the plain reverse side, but I liked the resist design side for this project, so decided to use that.

The paper was spritzed with two shades of Cosmic Shimmer Mists (Green chalk ink and black).

Then using the Creative Expressions stone wall mask and modelling paste the brick wall was created. Once dry I inked this with green and brown chalk inks. 

Both sides of the Jilly Bean Soup paper were used for the zig - zag and spot patterns, together with free hand cutting and punches. 

As this was for a layout for my son, I exchanged the pretty lace trim for some printed tape, but still used the striped ribbon. 

White bazzill was used for the photo mount and the scalloped trim.

I added a little Bakers Twine, some flat backed gold dots and American Crafts Thickers alphabet stickers.

I printed my journalling onto some spare cardstock and tucked it into a pocket under the photo 

Thanks Janina.

Thanks for looking
Lynn x

Saturday 3 November 2012

Three Generations / Six Generations CSI Challenge # 43

For this weeks CSI challenge I have been working with this photo of my ancestors.


There are three generations shown here and and one element of the challenge was to use an older photo and tie the past together with the present in your journalling. So the writing explains the family link between the folk in the photo and then goes on to explain how the family now has a further three generations (see below). My journalling is framed which was another element and I have hidden it under the photo, which folds open to show my scribbles and a family tree.


These are the colours for this weeks challenge:  Black Tie Event, Lemon Chiffon,  Green Grace,  Alabaster Elegance & Fancy Foliage. 


I used these evidence elements:


Damask - the Glitz Design paper from the Love Games collection.
Ribbons - ribbon with shell and bead trimming and tape measure tape.
Frame -  black Bazzill frame cut with Marianne Designs Die used behind photo for journalling.
Foliage - and flowers cut with various punches and Marianne Dies in green Bazzill and Basic Grey papers.
Something transparent  -   Acetate film strip.
Patterned brad - Basic Grey
Flourishes - cut with Marianne die and Green Bazzill
A Black-and-white patterned paper - The Glitz Design paper.

Here is my journalling, visible by opening up the hinged photo. It reads:

"This photo shows three generations of the family. My mother Mary Holder is the little girl on the far right. Next to here is her cousin Patricia Coppin. Next to Pat is her mother Gladys (Humm) Coppin. In the big chair is Gladys' mother Susan (Dunn) Humm. At the far left is Susan's eldest daughter Winifred    (Humm) Holder (Mary's mother and my grandmother). 
They are all sitting in the garden of 'The Bird In Hand' Public House, where Gladys and her husband Charles and Pat lived at the time. Bickley near Bromley.
Today Mary is a great grandmother to two (Jamie and Jessica Prior), grandmother to five Mark and Sam Prior, Andrew, Emily and Catherine Cooper) and mother to three Lynn (me), Sylvia and Robert Banks." 
Then I drew a basic family tree to explain the links.


Other items used are Serendipity papers by Basic Grey (green and yellow)
Crate Paper - Portrait Collection - Honeymoon and sticker border
Tim Holtz Distress Stains - Black soot and Shabby Shutters
Bazzill - Black and green
Flat Backed pearls and gems
Perfect Pearls
Paper blossoms - Wild Orchid Crafts
Sticker '3' from a sheet by Echo Park
American Crafts - Alphabet stickers
Martha Stewart - Round the page punch - Cherish
Lots of chalk and distress inks.

Another great challenge, this week.
Thanks for looking.
Lynn x

Thursday 1 November 2012

Crazy Girl


Here is my design team layout for the November Scrapology Scraplift challenge.


The photos are of my daughter Emily, we were out for the evening for a meal to celebrate my husbands birthday while staying in Fairlight. She had just started wearing glasses.

This month we are scraplifting the lovely Lou who is a fellow design team member. This is her original Layout.

Here is our sketch

Here is how I made my page:
The papers are from My Mind's Eye, The Sweetest Thing - Honey Collection
Gut the pink Bazzill to give me a frame 1" deep (12" x 12").

Trim the bee patterned paper to 11" x 11". Gut some of the cream paper from under where the photo mat will be placed about 3" x 3". Also cut the lettering strip 'One of a Kind' from the background and set aside. Stick this paper centrally over the gold frame.

Cut the floral paper to measure 6" x 4" round the corners and stick to right of honeycomb and roses detail.

Cut chicken wire to measure about 8" x 5" and attach to page with the two decorative brads near the top corners.

With four small photos, stick to white cardstock to appear like a photo-booth strip. Stick to centre of wire with 3D foam pads. 

Using the Cricut I the Journalling plates and mats then stuck as shown to the left of the photo with 3D foam pads.  (All cut using the Lacy Labels cartridge. Cut in Cream 'To From' @ 3", Cut in Gold 'To From Shift' @ 3", Cut in Cream 'Hugs' @ 3", Cut in Pink 'Hugs Shift' @ 3". Also cut in Floral 'Welocme' @ 1 3/4", Cut in Gold 'Welocme shift' @ 1 3/4".)

Cut a bee in black cardstock and add to bottom of plates (Cut with Home Decor Cricut cartridge).

Punch a flower from the gutted paper, honeycomb side up, ink and curl petals and apply on top of title block to the right side with a sticky fixer pad. Cut title and add this over the top of the flower. (I used the Cricut and the 'Paisley' cartridge to cut the word  'Crazy'.) Apply off the edge of bottom right of wire using 3D foam Pads.

Make some clay flowers using Fimo Light and a Martha Stewart mold.  When dry paint these with the pink and yellow acrylic paints and glaze. Arrange on layout, sticking down with 3D foam pads or wet glue. Decorate these with the wired leaves, curling the wires round a pencil as you go.

Add some journalling by cutting patterned paper into 9mm strips to feed through the Dymo gun. cut into short lengths sand to reveal the white core where the letters are, then ink. Stick in place over the journalling plates.

Pop over to scrapology to see what the rest of the design team created and for more detials of the challenge and prize.