h3.post-title font-family: 'Bad Script', cursive
Showing posts with label beads. Show all posts

Saturday, 2 September 2023

Fun in the Sun

Here is my final layout made with the Papermaze kit for the month of August.  A photo of my daughter, complete with face paint, taken on a day out to Pecorama, when on holiday in Devon.

For full details of how the layout is made can be found on the Scrap, Paper, Scissors Blog.  

From the kit I used:
Pinkfresh Studio - Tourist Mode collection - Sightseeing
49 and Market - Spectrum Gardenia collection - Classics Pink Skies
Bazzill Basics - 
Ivy
49 and Market Color Swatch Blossom Tickets Essential
Doodlebug puffy heart stickers
 
From my stash I used:
Pretty Little Studio - Sunkissed - Fun in the Sun Word Title
alphabet beads
pink wire
Doodlebug Designs Alphabet Soup puffy letter stickers - Cupcake
gems and sequins


That's all from the August kit, I'll be back with the September kit soon.
Thanks for looking
Lynn x

Monday, 16 January 2023

Lady in Red

A new Year and a new Papermaze kit, for January 2023! A kit of mixed colours containing patterned papers, Bazzill cardstock and embellishments. Here is my first layout, showing my daughter at her freind's wedding a few years ago. Once of a few guests allowed to attend the event due to Covid.


From The kit I used:
American Crafts - Paige Evans - Garden Shoppe collection - #08
Bazzill Basics Cardstock - Capers
& Pear

From my stash I used:
texture paste
Vicki Boutin Stencil from the Fernwood collection
Cricut
Acetate
White and yellow Bazzill
Beads and Sequins
Rosie's Studio - Hearth & Home - Puffy Alphabet Mini Stickers


Back tomorrow with my second layout.
Thanks for looking.
Lynn x

Sunday, 26 December 2021

Little Elves

Last Christmas I made Santa and Mrs. Claus two characters designed by Larissa Holland (mmmcrafts), and part of the 'Twas The Night Before Christmas' tree decoration collection. This year I made the girl and boy elves. The patterns for these delightful ornaments is availabel on Etsy UK. I also made the 12 Days of Christmas collection last year while away on holiday - details of my makes HERE.


Looking forward to making more of Larissa's characters for next year.
Thanks for looking
Lynn x

Thursday, 5 August 2021

Our Garden Nest

Peartree First Birthday Pear it up challenge # 1 Hidden element.
DAF Surprise challenge #6 - Adam's Dimensionals

The photos are from 1994, when we had a playhouse built for the triplets. They had great fun placing their toys inside and making 'tea'!


I used:
Mintay - Lovely Day collection
American Crafts foam and chipboard Thickers
Sequins and Beads
Sizzix die - leaves
DAF flair x 2
Doodlebug Designs alphabet rubons
Eyelet
Nuvo glitter drops
Acetate
Peartree Cutfile - Birdhouse

I made the birdhouse with two layers from the cutfile, one solid and the other fully cut out.
With funky foam between the two layers and acetate over the heart cutout, I filled the gap with beads and sequins. I attached the birdhouse under the small heart on the roof using a brad. This allowed the house to be swung aside toreveal another photo hidden underneath.


Thanks for looking
Lynn x

Friday, 14 October 2016

Cool Dude

I was inspired to make this layout while attending the Merly Impressions Retreat back in July. Chrissy had a display of her recent layouts and was happy for me to take photos and create my own version. I was able to buy some of the same papers and substituted others. Some months later I made this while at a crop. It has taken me a few more months to get around to sharing it with you all!


I used:
Kaisercraft - Fly Free Collection - 2 x Gal Pal, Sister
Kaisercraft - Boho Dreams Collection - Feather
Basic Grey - Basics
DMC embroidery thread - white

Great fun to create with this photo of Rosie taken earlier this year. 

Thanks for looking
Lynn x

Monday, 12 January 2015

Double Sprouts!

Another Christmas layout with the theme of racing sprouts. Just before Christmas 2012 I found some sprout crackers when shopping in Devon. The little wind up clockwork sprouts are designed to be raced. This caused much fun at lunch time on Christmas Day.


This is the first double layout I have made for a long time. I used a Pagemap from the same year.
The patterned papers are from Bo Bunny's Mistletoe collection. 


Mum and Dad 


We were a small group that year as Robert and Elaine were in Brazil and Andrew was in America.

A few close up photos:

My title was created with an old Making Memories wire and bead 'Christmas' word,
The black letters and numbers are both from Doodlebug Designs Inc. and the 'Sprouts' are American Crafts glitter Thickers.

I used lots of self adhesive gems.

The tree was cut from the papers and embellished with more gems. I added a yellow glittery chipboard star.

Thanks for looking
Lynn x

Sunday, 26 May 2013

Flight Lieutenant Kenneth Banks


This is my version of Anita's class page from the Cardinal Colours weekend crop back in March. I was lucky enough to make at a recent crop as I had been too busy at the weekend. The photo is my great uncle Flight Lieutenant Kenneth James Banks. The title using one of the labels on the papers has been changed to bear the motto of his Squadron 'Danger is our Opportunity'.

Kenneth was 21 when he died on 29th May 1945, having survived the WWII as a pilot. He crashed his Spitfire into the stained glass window of a church in Yorkshire. The more detailed journalling is written on the tag which is hidden under the photo which acts as a pocket.

The papers are Bo Bunny's Serenade collection. I used some tiny hole-less beads on the poppy centres and some Swirlydoo butterflies, glittered up with Stickles.

Thanks for another great class Anita, and here is her super original layout.


thanks for looking.
Lynn x

Thursday, 20 December 2012

December Crop Kit - Christingle


My son Andrew after the Christingle service outside St. Paulinus Church in Crayford. For several Christmases my three children loved to dress up to take part in the service. This particular photograph was taken in 1997. In fact this was one of my daughter Emily's memories in the Advent letters she is sending me, she remembers the first Christingle they attended when they were three. I snowed that weekend and so the photos taken in the graveyard were very atmospheric. I  have scrapped the photo with all three of them on that first year which I believe was 1995 several times, it has to be my favourite photo, her is is in black and white.


Back to the layout with Andrew the five year old shepherd! I went to the Paper Maze crop on Saturday and this month the kit was designed for us to create our own design. The kit contained beautiful three papers from Carta Bella's Christmas Day Collection - fast becoming a favourite line of papers of mine. The kit also contained two sheets of Bazzill, one in a deep, dark red and a white. There was ribbon, dew drops, gems, leaves, kraft tag, star beads, chipboard 'Merry Christmas' holly leaf ribbon and a Christmas rose.

In fact I still have all this to play with after making my layout, so I can easily make at least one more layout or several cards.


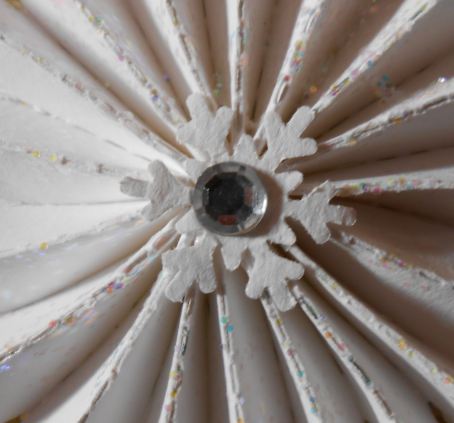
Vanessa had some dies, punches, embossing folders etc. all with a Christmas theme for us to use. I picked the Tim Holtz Alternation Sizzlets Strip - Snowflake Rosette Die.Which makes an assembled snowflake of approximately 3 1/2". I set about trying out this die and it wasn't as easy as it looks, but I mastered it in the end! I used 12" x 2" strips of the white Bazzill and ended up buying another sheet as I made a few errors (it really needs an extended spacer platform to cut evenly throughout the die) and needed some to mat my photo. 

In the end this is the method I found worked best.


1. Cut a snowflake from the strip of Bazzill.


2. Press the shapes out from the card, you end up with a small snowflake and the accordion shape.


3. Poke out the tiny diamond shapes that give the snowflake its pattern.


4. Accordion fold the long shape, I made mountain folds over the longer points.


5. Join the ends with some wet glue - It looks a bit like a very wide crown at this point!


6. I thought it would be a good idea to have a base to stick the rosette to and was going to cut some circles from scrap, but had a small pile of the snowflakes from the same die that I didn't plan to use so I added wet glue to the centre for the flat snowflake and arranged the accordion snowflake over this, it's tricky but you need to hold it in place for a few minutes until it's firmly held in place.


At this point it looks like this.


This is how it looks on the back. As I couldn't see what I was doing from the front, it is a bit off set, but it's not going to be seen so it's not a problem. If I was sticking this to the front this would be centered.


I used a snowflake from a Martha Stewart corner punch to cover the centre hole of my snowflakes, then added a flat backed pearl from the kit.


Then I added lots of glitter with my Ice Stickles. I repeated this five times to add a row of snowflakes across the layout, staggering them across the page above the reverse side of a piece of Carta Bella - Christmas Day - Ornaments cut to about 4" x 11 1/2", with the bottom corners rounded and the whole piece inked around the edges.


For the sixth snowflake which is at the top of the layout, I added a snowflake from the die and decorated this with flat backed gems from my stash. 

I would also like to try this die for the mini snowflake rosette- which is also available at Paper Maze 


I added my journalling to the tag in the kit and tied the string ties into a bow. 
I added the five glittery, red bead stars along the bottom panel along with the chipboard greeting. I painted the greeting with acrylic paint and then stained the letters with brown ink and the holly with red and green ink.

Thanks for looking.
Lynn x