h3.post-title font-family: 'Bad Script', cursive
Showing posts with label Paper Maze. Show all posts

Monday, 23 December 2019

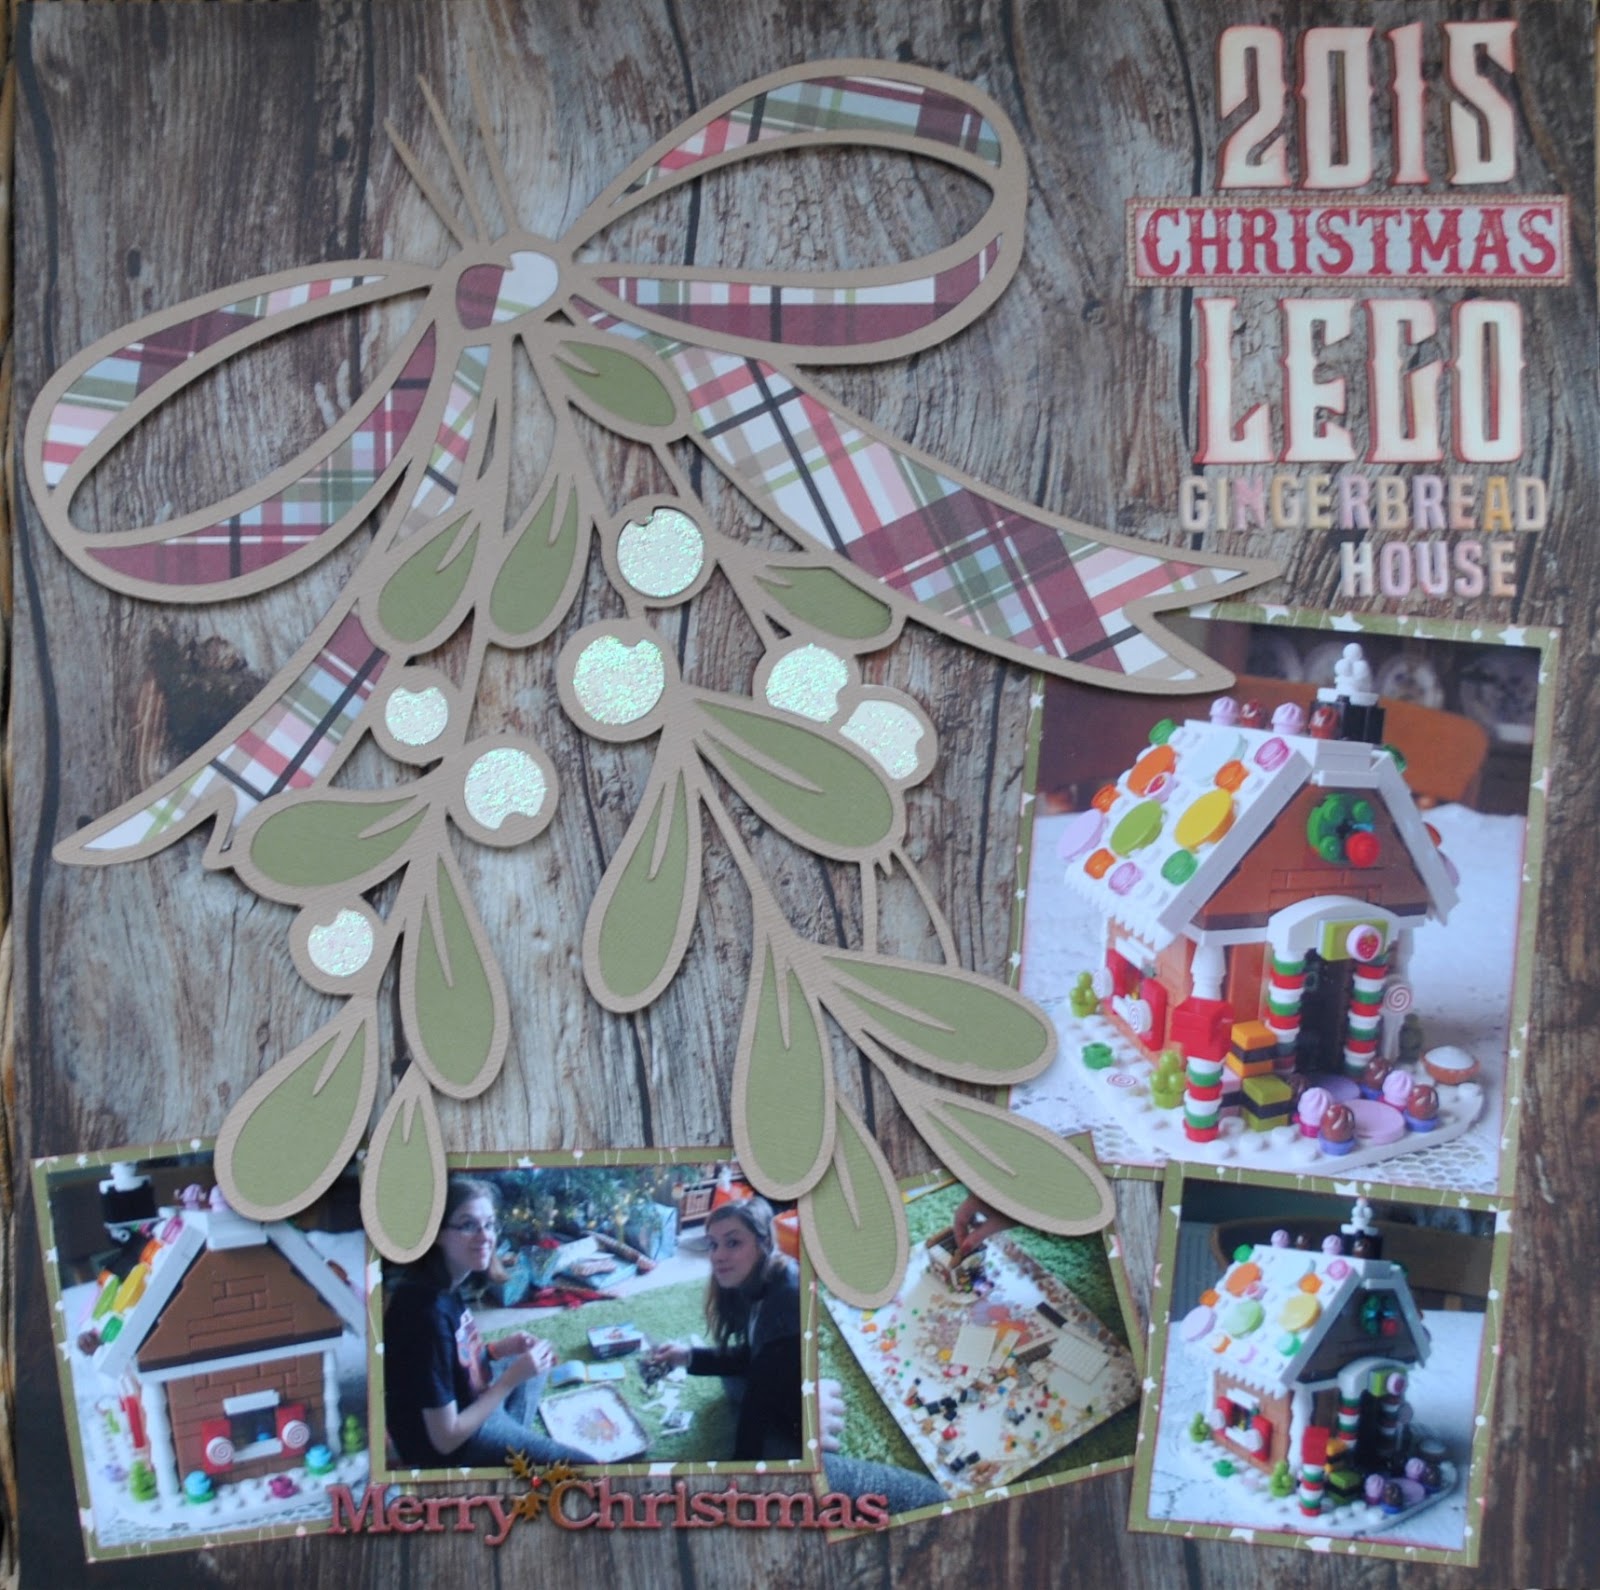
2015 Christmas Lego - Gingerbread House

Today I'm back with my third Christmas layout made with the December Papermaze kit. To purchase the kit have a look at the great new shop website, you will find all the products used on my post, and much, much more.  Details of how the layout was made can be found on the Scrap Paper Scissors blog.

This layout using the Mistletoe Kisses SVG file from Pink Fresh Studio, shows photos of a Christmas Lego project my big kids enjoyed building - Christmas eve 2015.


From the kit I used:Kaisercraft - Enchanted collection - Imagine 
Simple Stories - Holly Jolly collection - Cozy Christmas
Authentique - Rejoice collection - Rejoice #22Fawn, Buttermint & Safari Bazzill


From my own stash:
Fired Brick Distress Inks
3D foam padsPink Fresh Studio Mini Puffy Alpha Stickers - Just a Little Lovely.
Bigz XL Alphabet Sizzix die WonderlandCrystal Stickles & Xmas Red Stickles
Chipboard 'Merry Christmas'
Glossy Accents


I still have plenty of papers left so will be back with three more layouts soon.
Thanks for looking
Lynn x

Tuesday, 22 December 2015

Gift Box for Christmas Decorations

I made lots of friends and family sets of Walnut Christmas tree decorations a few years ago, and recently my sister asked for some more, her theme being pink, white and silver. So I set about making another 12 decorations for her. Once made I wanted a box to present them in that she could also use to store them in together with those I made her before.


Linda had given me some strong colourful boxes she no longer needed, and I remembered one of them was pink. Then  I selected some patterned papers from Papermaze - Sugarplums by Doodlebug Designs.


I decorated the box with two papers from the collection - Tiny Trimmings for the top & Christmas Trim for the sides. I used a Sizzix die to cut the lettering from corrugated cardboard, and painted them with Distress Paint (acrylic paints). They were then sprayed with pink iridescent glitter spray. Difficult to see the sparkle in the photos. I added some ribbon and a bow.


Inside of the box - lined with egg carton covered in Christmas tissue paper. with room to add the existing decorations.


Merry Christmas Sylvie
Thanks for looking
Lynn x

Saturday, 31 January 2015

Vera Enid 1925

The January Papermaze was a couple of weeks ago now, but was a good opportunity to catch up with creative friends. Vanessa designed the crop kit using papers from Crate Paper's Open Book collection. Another opportunity for me to scrap for my Holder family heritage album.

This is Vera Enid Kiff, age 3 in 1925. She emigrated to Canada a year after this photo was taken with parents Florence (my great aunt) and Charles.


The kit contained:
Patterned papers - Crate Paper - Open Book (Sweet Story, 3 x 5, Clippings)
Cardstock - Bazzill - Cinnabar
Prima flowers
Buttons
Chipboard Chevrons (which I covered with scraps of patterned paper and inked)
Twine
Dew drops
Lace
Filmstrip ribbon - Tim Holtz

I added letters cut from cardstock with Sizzlets alphabet die
Letter and number stickers from Prima
DMC thread for the buttons.

Here is Vanessa's lovely original layout:


Thanks for looking
Lynn x

Sunday, 30 March 2014

St. Katharine's Dock

Alan and I have been going through some old photo albums and scanning the photos to preserve them. We found this one he took of me at St Katharine's Dock in London when we first started going out together - so this will have been taken in about 1981.


This layout was also made at our weekend retreat last weekend.

I used:
Patterned papers and element stickers by Authentique from the Anchored (nautical) collection.
Divine Twine - Airmail from Papermaze
Memory Box die
Anchor charm
Distress ink

Thanks for looking
Lynn x

Tuesday, 23 July 2013

Father's Day

Here is my layout created at the Papermaze crop last weekend. As the papers were ideal for a masculine theme, I decided to create another page for my Dad's memory album. The photo was taken last month on Father's day.


Janet had designed the layout for this month and Louise had created an alternative. I love fonts and really liked the alphabet stamps used in Louise's version. I am also enjoying spray mists and layering so my layout was based more on Lou's design.

the kit contained:
Glitz Design 'Truly Yours' Motif paper, Brown and Aqua cardstock,  2 Kraft tags, Technique Tuesday Journalling card, Aqua Twine, Assorted wooden embellishments and Aqua Washi Tape.

with use of:
Peeled Paint and Walnut Stain Distress Ink
Melted Chocolate Dylusions Ink Spray

I added:
Thickers alphabet stickers from American Crafts
Some scraps of papers left over from last month's kit behind the tears and for stamping on.
Lili of the Valley Father's day greetings stamp.

 Here is Janet's original layout:
 and Louise's page
Thanks for looking.
Lynn x

Monday, 22 July 2013

Kodak Moment


Catching up with last month's Papermaze Crop kit designed by Janina. I used a photo I took with my very first film and my first camera. It was a Kodak Instamatic, and used the 126 film and flash cubes.
It was a gift from my parents for my 10th birthday and we were on holiday in Margate. I don't seem to have any other photos from this first film, but can remember taking this of my grandparents, at the end of the film, before taking it along to the camera shop to have it processed. The images were about 4" square with a white border.

This may not be the exact model I had but it certainly looks familiar.


The kit contained:
3 sheets of Bo bunny - Mama-Rassi2 papers - Contrast, Viewfinder and Photo Booth and a sheet of Bazzill - Pinenut.

I also used:
Cricut Elegant Edges Cartridge and the Swirl Image (shift) in 11" with a 9" gutted centre in Viewfinder paper, and a 10" shape in the Photo Booth paper
Martha Stewart Punch around the page set
Various blossoms from my stash
Distress Ink in vintage Photo
Marianne Die
American Crafts Thickers alphabet stickers.

This is Janina's lovely original layout:


Thanks for looking.
Lynn x


Wednesday, 3 July 2013

Sharing a Love of Books


My mum has always loved reading and shared this love with us as children and in turn, with her grandchildren. Here she is reading to Andrew when he was little. All three of my children love reading and books and have quite a collection between them.

This layout was created with a kit designed by Vanessa of Papermaze for the April crop. I have only just got around to using it. 

The content of the kit are:
Basic Grey Serenade papers - 50 pence, Shilling and Avalon
Vellum
Kaisercraft Turtledove paper - Geese
Crate Paper Sleigh Ride paper - Deck the Halls
Ribbon
Kraft Tag
Buttons
Twine
I added a Kaisercraft stamp, Distress stain and inks, DMC Stranded Cotton, My Little Shoebox Tiny Type letter stickers and some Prima letter stickers.

Here is Vanessa's original layout:


Thanks for looking
Lynn x

Friday, 17 May 2013

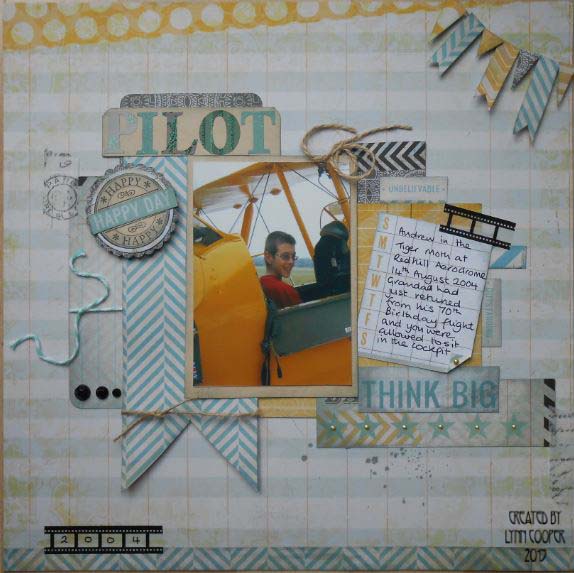
Pilot


Another layout for Andrew's album. I used this crop kit from Papermaze (November 2012). The photo shows Andrew in the cockpit of a Tiger Moth. We surprised my Dad with a flight for his 70th birthday and we all went along to Redhill Aerodrome to watch him fly. Well we saw him take off and land but in between he was nowhere to be seen! Once he returned to land, the instructor allowed all the grandchildren to have a turn sitting in the cockpit.

The papers are Pink Paislee's Portfolio collection - Stupendous, Outstanding and Unbelievable. American Crafts' Ready Set Go Surrounded Kraft. The kit also contained natural hemp, bakers twine and vellum.

I added some Liquid Pearls to the stars and some flat backed pearls to the left mat. I also used some Queen and Co. and Tim Holtz washi tape. The title was made which some stickers I have had for a long time and I don't know who made them. I also splashed on some distress stain in Iced Spruce.

Thanks for looking.
Lynn x

Thursday, 16 May 2013

Me & My Girls


This is what I made with this month's Papermaze Crop Kit. The page was designed by Vanessa and was a great excuse to try the new Ranger Distress Paints by creating a water colour effect.The paint colours were perfect for this photo of Emily, Catherine and me taken on their 21st birthday.

The Background was created with the paint and water and left to dry. The circle was hand drawn with a few dots of Liquid Pearls added here and there.

I cut my five flowers on the Cricut with the Flower Shoppe cart, a random selection of flowers in different sizes until I had enough. These were all cut from white Bazzill. they were then inked with the same colour as one of the paints, but in Distress Ink, and spritzed with water, screwed up, dried out and opened out again. Then they were layered up and a clear dew drop added to the centre. The smaller flowers are spiral flowers which were also cut on the Cricut, and coloured in the same way. Some were cut from a piece of Basic Grey Kissing Booth Lip Lock paper. The leaves were cut from two shades of green Bazzill with Memory Box and Marianne dies.

I inked the Prima butterfly which started off a beige colour. I used my wired twine to made spirals and tucked them in amongst the flowers. The mutli-coloured strips of patterned papers are cut from a sheet of Pink Paisley paper, She Art collection - Soar. The photo mount is cut from Marigold paper from the Ambrosia collection by Bo Bunny.

My title was had written and 'GIRLS' was cut with the Alphalicious cartridge on the Cricut.

Here is Vanessa's original layout:


Thanks for looking.
Lynn x

Thursday, 20 December 2012

December Crop Kit - Christingle


My son Andrew after the Christingle service outside St. Paulinus Church in Crayford. For several Christmases my three children loved to dress up to take part in the service. This particular photograph was taken in 1997. In fact this was one of my daughter Emily's memories in the Advent letters she is sending me, she remembers the first Christingle they attended when they were three. I snowed that weekend and so the photos taken in the graveyard were very atmospheric. I  have scrapped the photo with all three of them on that first year which I believe was 1995 several times, it has to be my favourite photo, her is is in black and white.


Back to the layout with Andrew the five year old shepherd! I went to the Paper Maze crop on Saturday and this month the kit was designed for us to create our own design. The kit contained beautiful three papers from Carta Bella's Christmas Day Collection - fast becoming a favourite line of papers of mine. The kit also contained two sheets of Bazzill, one in a deep, dark red and a white. There was ribbon, dew drops, gems, leaves, kraft tag, star beads, chipboard 'Merry Christmas' holly leaf ribbon and a Christmas rose.

In fact I still have all this to play with after making my layout, so I can easily make at least one more layout or several cards.


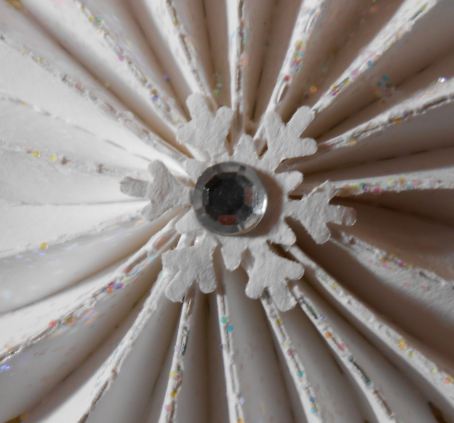
Vanessa had some dies, punches, embossing folders etc. all with a Christmas theme for us to use. I picked the Tim Holtz Alternation Sizzlets Strip - Snowflake Rosette Die.Which makes an assembled snowflake of approximately 3 1/2". I set about trying out this die and it wasn't as easy as it looks, but I mastered it in the end! I used 12" x 2" strips of the white Bazzill and ended up buying another sheet as I made a few errors (it really needs an extended spacer platform to cut evenly throughout the die) and needed some to mat my photo. 

In the end this is the method I found worked best.


1. Cut a snowflake from the strip of Bazzill.


2. Press the shapes out from the card, you end up with a small snowflake and the accordion shape.


3. Poke out the tiny diamond shapes that give the snowflake its pattern.


4. Accordion fold the long shape, I made mountain folds over the longer points.


5. Join the ends with some wet glue - It looks a bit like a very wide crown at this point!


6. I thought it would be a good idea to have a base to stick the rosette to and was going to cut some circles from scrap, but had a small pile of the snowflakes from the same die that I didn't plan to use so I added wet glue to the centre for the flat snowflake and arranged the accordion snowflake over this, it's tricky but you need to hold it in place for a few minutes until it's firmly held in place.


At this point it looks like this.


This is how it looks on the back. As I couldn't see what I was doing from the front, it is a bit off set, but it's not going to be seen so it's not a problem. If I was sticking this to the front this would be centered.


I used a snowflake from a Martha Stewart corner punch to cover the centre hole of my snowflakes, then added a flat backed pearl from the kit.


Then I added lots of glitter with my Ice Stickles. I repeated this five times to add a row of snowflakes across the layout, staggering them across the page above the reverse side of a piece of Carta Bella - Christmas Day - Ornaments cut to about 4" x 11 1/2", with the bottom corners rounded and the whole piece inked around the edges.


For the sixth snowflake which is at the top of the layout, I added a snowflake from the die and decorated this with flat backed gems from my stash. 

I would also like to try this die for the mini snowflake rosette- which is also available at Paper Maze 


I added my journalling to the tag in the kit and tied the string ties into a bow. 
I added the five glittery, red bead stars along the bottom panel along with the chipboard greeting. I painted the greeting with acrylic paint and then stained the letters with brown ink and the holly with red and green ink.

Thanks for looking.
Lynn x

Saturday, 15 September 2012

It's In Here Somewhere

When my friend Helen posted this photo of her cute little boy Myles on facebook, it really made me smile. I thought it would make a fantastic subject for a scrapbook page. Then when I saw Vanessa's (Papermaze)  post on Scrap, Paper, Scissors last night, showing the crop kit for today I knew it would be ideal for this photo. I just needed to change the orientation of the page to accommodate it. So I set off this morning with a colour and a black and white version of Helen's photo - ready to crop!

Here is my finished layout:

The layout uses My Mind's Eye - Lavender collection - Collage and Flowery
Simple Stories - Documented - Words to Live By
Basic Grey Kissing Booth - Lip Gloss
Craft Core No. 6
Bazzill in Beach and Chili
Peach Bakers Twine
I wooden Leaf
Lace

Punches, Embossing folders, sewing machine, inks, mask and acrylic paint.
I used two different Cuttlebug alphabets for my title and added a flat backed pearl.


This is Vanessa's original of herself as a bridesmaid in the 1970's


Here is Helen's lovely photo, in B & W as well as colour - so glad she had the camera/phone handy. I think the quality is not bad considering I took it from facebook. Must remember to ask her for the original.


Looking forward to meeting this little man one day soon.

Thanks for looking

Lynn xxx

Saturday, 25 August 2012

Jelly Time

I purchased a kit from the July Papermaze Crop, as I didn't have all the tools from the class, I put it together a little differently.


The papers in the kit are Crate Paper - Pretty Party - Tag Cuts, Stitch and Streamers.
Bazzill - Topaz
Pink Cotton Candy Twine
Pink dew drops
I didn't use the the Tando Creative Butterfly as I didn't have the means to emboss it, but I will save it for another page.

I used several Martha Stewart punches - round the page, deep edge, border and butterfly.
I added Cosmic Mist instead of paint

I added some flat backed pearls, ribbon, American Carfts Thickers for 'Time' and I used the Cuttlebug to cut Jelly from paper.

The photograph is of me at the age of two years in our back garden at a gathering to celebrate my sister's Christening. I'm sure I don't remember the occasion and the things from that day, but I do remember several things in this picture from my childhood.

The journalling reads:
I remember the:
Green glass sundae dishes
Silver spoons Mum's jellies
Blue frilly party dress
Hair bows.

Close up of butterflies:

Here is Vanessa's original page.

Thanks for looking.
Lynn x

Tuesday, 21 August 2012

Godmother

Here is my version of this month's crop kit for Papermaze. It was designed by Louise Collins. I love the colours and designs of these Carta Bella - Paris Girl papers. Great to make a shaped layout too.


 I flipped the page as I like my photo subjects to be looking into the page rather than off the edge!
This photo is one I found recently of my sister Sylvia, at her Christening with her Godmother Sylvia. I have already scrapped some of the beautiful photographs that my father took on that day, but recently found a few more which I scanned. This one is so 1960's. My title was created with a rub-on from Kaiser Craft, but I altered it to read Godmother rather than mother with another rub-on from the same sheet. I added some Making Memories rub-on numbers for the date.

This layout used Bazzill, Carta Bella Paris Girl Papers - French Labels and Paris Borders, black lace, Queen & Co. grey flat backed pearls, Smash tape - black dots and pink chalkboard glimmer mist.

Here is Lou's pretty original layout.

Great kit, really enjoyed making this up.
Thanks for looking

Thursday, 21 June 2012

Special Memories from School

In 2003, on the very last day of primary school (St. Paulinus) Andrew, Catherine and Emily's class had a special service in St. Paulinus Church, in Crayford. This photo shows Andrew in the church yard just after that service.

I used the May Papermaze Crop kit to create this page. It was designed by Janet Warren, but I can't find it on the Papermaze blog to show you her original, I'm sure I saw it there before!


It was good to work with masculine papers for a change.

The kit contained papers from Simple Stories, Documented Collection (Memories, Damask/Flourish and Bingo Cards / Chevron).


Pinecone Bazzill
Brads and a pearl swirl.


I cut two bingo cards from the paper to say 'Special Memories'.
I gutted the stripe paper so I could use the dots on the reverse for my photo mat.
I cut some ribbons from the cardstock using the Cricut and added liquid pearls to them.
I also cut a selection of stars using the Cricut, inked and layers them to the bottom left of the photo.

That young man is now 20 years old and today he is travelling home from Switzerland - looking forward to seeing you tonight Andrew - safe journey x
Thanks for looking

Wednesday, 20 June 2012

A Box of Books

While at Paper Maze on Saturday I purchased the crop kit for June. As I mentioned yesterday I decided to use it to make a layout of Emily at 20 months showing how she used to tip all the books out of the box and get it it to read!


This page was designed by Vanessa and uses papers from October Afternoon's Sasparilla Collection (Rustler, Wagon Train, Stagecoach, Tumbleweed and Pony Express)
Bazzill in Berrylicious, Natural and Indigo
Blue buttons ( I added some red and cream ones)
Cherry Red Bakers Twine (I added some Navy)
and some Natural Ribbon.


Some close up photos

I used one of the buttons to centre my windmill rather than a paper rose.


I used my Stampin' Up punch to create my bunting, but followed Vanessa's method of stringing the flags together.


I used Basic Grey's PB&J letter stickers as did Vanessa, with some letters created with spare papers and a Cuttlebug alphabet die set.


Here is Vanessa's original, please see the Papermaze blog - 'Scrap, Paper, Scissors' for more details - There is a link in my sidebar.


Here are the original photos of Emily, taken in 1993 at home. She looks amazed at the news in this Lego catalogue!


Love these pictures, although they are scanned in from the original negatives so the quality is not brilliant, but the memory is preserved.
Thanks for looking.
Lynn x