h3.post-title font-family: 'Bad Script', cursive

Wednesday, 30 June 2010

Moot Hall Area - Aldeburgh

52 Walks with My Camera in 2010 - Week 26

I'm late putting up my photos for week 26, but here they are at last.
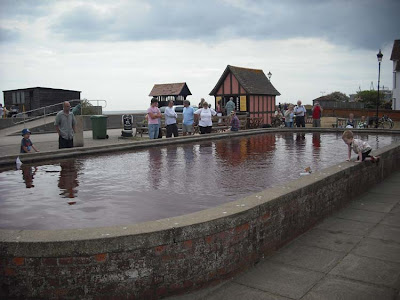
This time I visited one small area of Aldeburgh, I will return another week to show you more. This town is know as 'a place of energy and inspiration for music and the arts'. Aldeburgh is a coastal town in Suffolk, East Anglia, Notable for its Blue Flag shingle beach and fisherman huts where freshly caught fish are sold daily, The Aldeburgh Yacht Club, which thrives mainly in the summer, and its two fish and chip shops. The internationally renowned Aldeburgh Festival of arts, which takes place at nearby Snape Maltings. The festival was created in 1948 by the resident and acclaimed composer Benjamin Britten.
A popular weekend destination, particular attractions are the ancient Moot Hall (where the town council still meets today), Napoleonic-era Martello tower to the south, sheltered yachting marina at Slaughden, and two family run shops serving fish and chips, one of which is often cited as among the best fish and chip shops in the UK.

The first two photos are of the old Moot Hall.


More from this lovely town later in the year.
 
Log - 52 Walks with My Camera in 2010 so far:1. Bexleyheath, 2. Woodbridge River Front, 3. Hall Place Greenhouses, 4. Chislehurst, 5. Bluewater, 6. Theatre Land,7. Leeds, 8. Orford, 9. Snape, 10. Chatham,11. Nottingham, 12. Twickenham, 13. Woodbridge. 14. Red House. 15. Debden House. 16. RAF Bentwaters. 17 Friston and Saxmundham. 18. Ufford. 19. Wickham Market. 20. Greenwich Royal Park. 21. Felixstowe. 22. Trafalgar Square to Leicester Square Gardens. 23. Garden. 24. St James' Park. 25. Hall Place Gardents. 26. Moot Hall - Aldeburgh.

Sunday, 27 June 2010

Poppies


The passion for promarkers challenge this week (47) is to make a card depicting one of your favourite things. I love many flowers u especially poppies and brought this stamp from Stampin' Up back in April and this is the first time I have used it! I made two masks and stamped a line of poppies, marking off two at a time I stamped another in between until I was happy with the arrangement. Then coloured with Red, Berry and Poppy promarkers, the stalks and leaves were coloured with, Moss, Olive and Pear, the flower centres were coloured with Cool Greys 4 and 5. I decided to keep this one simple and mounted it onto black Bazzill card stock, then a white card I cut myself also from Bazzill. The 'bloom' stamp was from the same set as the poppy 'Bloomin' with Beauty'. I added a Making Memories red square gem brad and some fine organza ribbon.

I have failed to get a good photo of the poppies around and about this year, so I took advantage of the lovely images on google.


Ugly Mug


We finally won an Ugly Mug!  We have been listening to Radio Suffolk in the mornings for some time and they have a conundrum competition every day.  We frequently work out the correct answer but getting through on the phone is another matter. Then on the few occasions we have got through we have not won the draw. Until Friday morning, when we not only got through but got a call back to say we had won. The Mug and some tickets for a local festival, plus a t£20 token for a meal at a local restaurant arrived in the post the next day.


Saturday, 26 June 2010

Triplets go to Cornwall

Oliver

I had a lovely package of photographs in the post from Heather (Mum of the triplets) today. They had a holiday in Cornwall and she sent me lots of pictures, here are just some of the favourites. Layouts to follow!


Lucy and Heather make daisy chains


Oliver's scary Crocs

Hannah


Lucy

They live in London so it is lovely for them to go to their grandparent's cottage by the sea with this big garden.

Wednesday, 23 June 2010

Hall Place

52 Walks with my Camera 2010 - Week 25


Hall Place is a fine Grade I listed country house built in 1537 for Sir John Champneys, a wealthy merchant and former Lord Mayor of London. The house boasts a panelled Tudor Great Hall, overlooked by a minstrel's gallery, and various period rooms. The 17th century additions and improvements by Sir Robert Austen include a vaulted Long Gallery and splendid Great Chamber with a fine plaster ceiling.


Managed by Bexley Heritage Trust, this beautiful estate of 65 hectares stands on the banks of the River Cray at Bexley. Surrounding the house are award winning formal gardens with magnificent topiary, enclosed gardens and inspirational herbaceous borders.


There are many rose beds.

The back of the hall viewed through the trees.

The Maze

Back to the front of the building.

Log - 52 Walks with My Camera in 2010 so far:1. Bexleyheath, 2. Woodbridge River Front, 3. Hall Place Greenhouses, 4. Chislehurst, 5. Bluewater, 6. Theatre Land,7. Leeds, 8. Orford, 9. Snape, 10. Chatham,11. Nottingham, 12. Twickenham, 13. Woodbridge. 14. Red House. 15. Debden House. 16. RAF Bentwaters. 17 Friston and Saxmundham. 18. Ufford. 19. Wickham Market. 20. Greenwich Royal Park. 21. Felixstowe. 22. Trafalgar Square to Leicester Square Gardens. 23. Garden. 24. St James' Park. 25. Hall Place Gardents.

Accordion Cards Part 2

Continuing on from yesterday, here are three more accordion cards, following the same basic pattern.

For the birthday card I used yellow chunky letter stickers by Making Memories, 12 Yellow and 18 green pastel eyelets also from Making Memories, yellow organza ribbon 1m x 3mm, green gingham paper, a 12”x12” sheet of yellow card and daisy stickers by Paper Bliss.

This card was made by cutting four separate panels and joining them together to form the accordion effect. The 4 pieces are 10 x 12cm and cut from the yellow card. To attach the four panels together I used a pencil to mark the eyelet positions 1 cm in from the sides, and at 2 cm intervals starting 2cm down from the top. Five holes are made down both sides of two panels, and five holes down the right side of one panel and the left side of the remaining panel.

I lined up the panels and divided ribbon into three equal lengths to lace the panels together through the eyelets much as you would a pair of shoes! I finished off with a bow at the top of each row of eyelets then trimmed the ends.

To decorate the first panel I cut green gingham to 10 x 8cm and 8 x 6cm, and yellow card to 9 x 7cm. I mounted these centrally one on top of the other then spelt out ‘HAPPY BIRTHDAY’ with the letter stickers. I added a single daisy near the bottom of the panel.

I treated the third panel in a similar fashion cutting green paper to 10 x 7cm and 8 x 5cm, cut yellow card to 9 x 6cm. I spelt out the details of who the card was ‘TO’ and ‘FROM’ with the yellow stickers and placed a single daisy in one corner.

For the second and forth panels I cut green gingham paper to 9 x 7cm and 11.5 x 5.5cm and mounted them centrally onto the card panels, I stuck the two largest stickers centrally on top of these mounts.


 For the birthday girl card I used Poolside jigsaw lowercase alphabet, 18 lilac and purple eyelets and 2 lilac snaps, Heidi Simply Stated alphabet rub-ons all by Making Memories. I also used a selection of lilac and purple ribbons, a 12” x 12” sheet of lilac card, a 12” x 12” sheet of baby lilac hearts, Baby Boutique paper by Paper Adventures and a scrap of purple card. The paint used was white and lilac acrylic paint. The butterflies were from Lakeland (what a shame they don't sell craft products any more) :(
This card was also made by cutting four separate panels and joining them together to form the accordion effect. I cut four pieces 13 x 15cm from the lilac card. One piece of purple card 11.5 x 9.5 attached centrally to one piece of lilac card. Then four pieces 8.5 x 9.5cm from the patterned paper and mounted centrally on each piece of card.

I prepared the card letters by painting with lilac acrylic paint, then dry brushing each letter with white acrylic paint. Once dry, I decorated the letters by tying scraps of ribbon and fibre into bows or knots at random. The ‘G’ was attached to the centre of the piece of card with the double mount, then each of the other letters to the centre of the patterned paper.

I spelt out the word’ BIRTHDAY’ with the white Simply Stated Rub-ons on a scrap of purple card. Then trimmed the card close to the lettering and mounted this to one side of the ‘G’.
To attach eyelets and snaps I took the ‘I’ and ‘R’ and placed three eyelets down both sides, about 3cm apart and starting about 4cm down from the top. Repeating this on the right side of the ‘G’ and the left side of the ‘L’. On the left side of the ‘G’ and the right side of the ‘L’ I attached one snap 7cm down from the top.
 I lined up the letters in the correct order to spell ‘GIRL’ and with nine lengths of lilac ribbon (about 15cm long), set about joining the cards together through corresponding eyelets. Each length of ribbon was tied in a knot at the front, then trimmed.  Finally the tiny butterfly decorations were added to each panel.


Finally for the Garden Party invitation I used gold lettering peel-off stickers, glue dots, yellow gingham 12”x12” paper by Making Memories, 80cm Wired daisies ribbon and 3D Floral stickers from Rymans

I cut the gingham paper to measure 30x126cm, this was scored and folded in half lengthwise. Then I scored and folded again at 7.5cm intervals. This made the card stronger and gave pattern on both sides.  I cut eight lengths of five wired daisies, and arranged them in an arch shape at the top and bottom of each panel. They were stuck in place with glue dots. I used the gold lettering peel-offs to spell ‘GARDEN PARTY INVITATION’ on the first panel. Next I added all the details of the party to the third panel also using the gold peel-off sticker letters.  Finally I stuck the 3D flower basket to the second panel and the bouquet to the fourth panel.


Tuesday, 22 June 2010

Accordion Cards Part 1

Some time ago I promised to share the cards I made for the magazine 'Quick Cards Made Easy'.  I did about two of these then forgot.  So I plan to resume this idea now.  Starting with the cards I made for an article about making accordion cards.  I was asked to make a selection of different cards and they had to be quite quick and easy to make.

I started off with how to make a basic accordion card, then gave details about decorating each one.
Using a 12”x12” sheet of card stock I measured out with ruler and pencil 30 x 14cm rectangle and cut with craft knife and metal ruler. Then I used a pencil and ruler again to mark out 7.5cm intervals across the length of the card, ending up with four sections and three lines. I scored these lines with a metal ruler and embossing tool.

Then I folded the card concertina style, so that the first fold is on the right side of the card when closed. A bone folder or ruler run down the length of the folds to make a nice sharp fold.

The first card is a baby boy card which is 12 x 7.5cm.
I used blue card as a base with scraps of yellow card. Baby boy buttons by Craftime. Rubber stamp alphabet by Hero Arts. Turquoise dye based ink pad. Glue dots and Baby Boy die cut card stickers by Doodlebug Design.


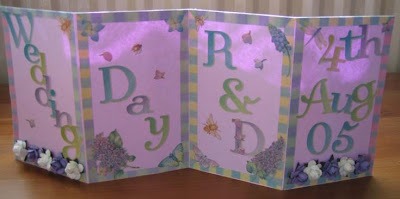
The next one is a wedding invitation. I used lilac card. Paper Roses from Hobbycraft. Juliana die cut alphabet by K & Co.

Around the edge of the sticker sheet is a fine (6mm) border, I peeled this away from the sheet and used it to frame each panel of the card, mitering the corners for a more attractive appearance.
I used the letters to spell out ‘WEDDING’ on the first panel and ‘DAY’ on the second panel. Picking out the ampersand and the bride and groom’s initials for the third panel and the wedding date on the fourth panel.

I selected a mixture of white and purple roses and applied them along the bottom of the first and fourth panels, where they will not become squashed when the card is closed. From the sticker sheet I selected flowers and insects to add more decoration.


The third card is a beach party card. I used beach and balloon buttons by Craftime, a fine black pen and sand print paper by PSX. More Juliana die cut alphabet by K & Co. and the Highlight LET font on the computer.
This time I used blue card and cut to 30x14cm. Score and fold at 7.5 cm intervals. I cut a strip of sand print paper to 30x8cm. Using the computer I typed in Highlight LET font the details for the party. I printed this in landscape format with the lettering to the right side of the paper. Then I cut along the top long edge following the wavy pattern on the paper and stuck it along the bottom of all four panels of the card.

Next I took the Juliana letter stickers to spell out the words ‘BEACH PARTY’ and arranged them in a wavy pattern above the sand. The buttons were then arranged and stuck down with glue dots. I drew strings from the balloon buttons so they appear to be tied to the letters and the sand castle.


More of these tomorrow. Thanks for looking.

Monday, 21 June 2010

Georgina Louisa

I'm ready early for next months Scrapaholix club with this layout of Alan's grandmother Georgina Louisa. I love the detail in this old photo, the hair do and decoration, the folds of the velvet dress, the collar and the beads.


The papers are My Mind's Eye, and they are quite dark so I brightened them up with some lace and sparkle.
The dressmakers form is made using a template I have had for years. I cut this from the black and beige Core'dinations card stock supplied. I inked it and added stitches to give the form a bit of shape. I decorated it with a scrap of lace and beads. I cut the patterned paper with shaped scissors and stitched round it twice with the sewing machine and a straight stitch. The blossoms are supplied with the kit and I coloured them with chalk inks and glitter glue. They are attached with a selection of brads from my stash. The photo is inked and mounted on the olive greed card stock supplied, it is trimmed with scalloped scissors and perfect pearls are added in dots to decorate. The large scallop is cut from beige card stock. The swirl is created using brown stickles.
I added some torn, inked and crumpled pages from a second hand book. The title was cut using a sizzlet alphabet - boxed brush.

My layout is inspired by the work of the talented Gabrielle Pocllaco do take a look at her blog  Such a Pretty Mess.

Sunday, 20 June 2010

Happy Fathers Day

Card Making with Cricut (Annie's Attic: Paper Crafts)I'm off to my parents house this morning, the children have celebrated Father's day with Alan and he has gone sailing. the rest of us will travel to see my Dad and Mum.

I made this 4 1/2" card first.

I couldn't cut the matching envelope on the Cricut Create (I need the Expression!). So I then made the slightly smaller owl at 4".


Here is card and envelope together.

The outside of the envelope.

The open envelope showing the beauty of using these double sided papers from Basic Grey's Max and Whiskers Collection. I used large gems for the pupils and mounted the eyes on 3D foam pads.


I made these owl cards using the 'Wild Card' Cricut Cartridge. My Cricut cart collection has grown over the last few weeks owing to my big birthday. I had this super book 'Card Making with Cricut' from Alan together with the 'Wild Card' cart.


He also got me the 'Wild Card' Cartridge as this is used for many of the projects in this book.

My Friends Linda and Jill gave the the paper dolls carts. Thank you to all. x
All three available from Cardinal Colours.

Just need some time to play with them all now!

Saturday, 19 June 2010

Wishing You Success


This is my entry for the week 56 Passion for Promarkers challenge. There is a sketch and a theme this week.


MALE is the theme.

When we went to the Craft Barn recently, I chose a few stamps. This is from Stamping Bella and is called 'Noah the Computer Guy'. He reminded me of my son, Andrew. I made him a card to acknowledge the end of his exams and leaving school. The papers are Max and Whiskers from Basic Grey. I cut the star frame on my Cricut using the 'Wild Card' cartridge.

Updated on 27/06/10 to say I was picked for the top five!!

Friday, 18 June 2010

Thanks Anita

Another thank you to Anita, for this lovely card that arrived in the post with the charms. So special to get something so lovely, unexpectedly through the post, and not just the usual bills, junk mail and forms.

It's delightful and it can also be seen on Anita's blog.


Thanks Anita x.

What a Gem!


My friend Anita is such a gem!  I asked her to send me some more of the wonderful jewellery she makes. The girls wanted to give some of her lovely angel hand bag charms to their best friends on leaving school this week, a sort of 'keep safe' charm. Anita sent me this lovely selection for them to choose from. Only problem is - it's so hard to choose they are all delightful, and such fantastic colours.


Check out Anita's blog if you are interested to see more stunning creations by this talented scrapper, card maker etc. etc....

Thanks Anita x

... And be Quick!!

After school yesterday my darling daughter (Catherine) asked me to make her four thank you cards for her 'A' Level subject teachers, head teacher and form teacher. She needed them for today.  I had loads to do and was out at our monthly crop last night too. She said she knew she should have asked me earlier but....!

The fairy for her form teacher

So it was out with the Cricut and my two new cartridges - 'Everyday Paper Dolls' and 'Dress Up Paper Dolls' (kindly given to me for my birthday by Jill and Linda - thanks so much girls x).  Catherine had already chosen which characters she wanted, and she had a rummage through my box of scraps and my box of blank cards and picked out the colours she liked for each card. Then we set to in a kind of conveyor belt mode, using two cutting mats. She trimmed card and stuck it onto the mats, I cut the images, and removed them from the mat while she prepared the next piece!

Super Hero for the drama teacher

Later in the evening I inked the pieces and stuck them together. I used peel offs for a very quick greeting. If I had had more time I would have chosen some patterned papers for the backgrounds and maybe layered the pieces for better effect. I did use a few gems on the fairy card. Never mind, she was pleased with the cards and will give them out at a special leavers dinner tonight. I cant believe my babies are leaving school, where did those 14 years go?

Graduation for her Head Teacher who has been a big support to her for seven years and also a big part of her drama studies. He often wears hes gown at presentations and big assemblies.

The Dancer for her dance teacher.