h3.post-title font-family: 'Bad Script', cursive
Showing posts with label Foam Stamps. Show all posts

Monday, 7 September 2026

New Baby Boy

If you pop over to the Papermaze Blog today, you will see two layouts I have created. This month I'm using 49 and Market's pretty pastel Glimmer & Glee collection. This collection has water colour style images, which are great for documenting parties, birthdays, babies, and garden gatherings. The palette is a clever mix of pretty corals, pinks, yellows, blues and greens. This first layout has photos of my great nephew at 7 weeks.


Full details are on the Scrap, Paper Scissors Blog

The items I used:
49 and Market - Glimmer and Glee collection - Jubilee & Laser Cut Elements 
Distress Ink - Faded Jeans
Distress Paint 
Faded Jeans &  Scattered Straw
3D Foam Pads
Making Memories Foam Stamps
Nuvo Glitter Drops - Gold Coast. 
Tim Holtz Alphanumeric 'Label' & 'Tiny Type' Sizzix Thinlits set
Doodlebug Designs Sunshine card stock Alphabet Stickers - Bumblebee
Acrylic domes in pastel shades
Acrylic heart


That's all for today, 
I'll be back with more from this collection tomorrow.
Thanks for looking.
Lynn x

Saturday, 21 March 2026

Looking Cute

Today was the Papermaze crop and I designed the crop kit layout this month. This one shows my daughter and her daughter, having fun exploring their image in the mirror. It was fun to get the old foam stamps out for a play too! 


Kit Content:
12” x 12” Smooth White Bazzill
A4 white card
6” x 12” Pink Paislee –#03
6” x 12” Maggie Holmes Round Trip – Passage
3” x 3” Heidi Swapp – Sunchaser – Sunshine
5” Doodlebug Designs Washi Tape
10” Jute twine
A sprinkle of sequins

*** It’s worth reading through before cutting or sticking! ***


Stencil small hearts across the layout using both colours of Distress Oxide Inks and the VB Stencil. (Wipe the stencil clean between colours to prevent the colours getting messy!) Splatter a little wet ink over the page too. See positioning on sample layout. Tear a piece from the top of the Bazzill.


Use the inks provided to ink the edges of the photo mounts, tags and other cut pieces (optional).

Prepare your photo - depending on the size of your photo, (I started with a photo 4” x 5.25”, so the following measurements reflect this, please adapt to your own photo size).
First layer is white card 4.25” x 5.5”, Black and white floral side of #03 paper 4.5” x 5.75”, and pink ombre side of #03 paper 4.75” x slightly deeper at 6.25”. Don’t stick the photo down yet.


From the Passage paper die cut 2 tags (one yellow side up and one rainbow stripe side up). Cut a piece 3” x 2.25” yellow side up and a piece to fill the tear at the top of the page, rainbow side up.


Cut a piece of white card 2” x 3.75” and apply to the rainbow tag, write your journaling onto this tag. Die cut two rings from the scraps of #03 paper, and apply to the tags. Thread a length of twine through the hole in each tag. 


Using the rest of the A4 white card stamp the letters needed to make your title / part of your title. Use the paintbrush and the Distress Paint, then allow to dry. Cut the letters out with a fine white border, then ink the edges with the pink ink. 


Build the layout by placing everything into position before sticking down. Once happy with the arrangement, stick the small pieces of patterned paper at top left of photo, and the yellow tag into position so that about 1.5” show beside the photo. Make the mounted photo into a pocket for the journaling tag - put adhesive onto three edges of the photo, so it is only glued down at the top, bottom and left side, allowing room for the journaling tag to be slipped in and out easily. 


Arranging the title letters along the base of the photo, stick some flat, and others raised with 3D foam pads. Add other words to the title with your own choice of lettering.


Divide the washi tape, and place a piece at the base of the torn cardstock area, and the other piece at the top of the photo.

Scatter the sequins, randomly over the page. 

Thanks for looking
Lynn x

Lynn Cooper for
www.papermaze.co.uk 2025

Monday, 1 September 2025

It's A Girl Thing!

today I have a new post on the Papermaze Blog, featuring the summery August kit. It is available to buy from the store and online. Here is the first of the layouts in that post, the photos here show four generations of females in our family. 


For the details on making the layout please see the blog. 

From the kit, I used:
Bazzill Basics Cardstock - Fussy, Aqua, Granny Smith, Tangelo, Pollen and Coconut Swirl 
Echo Park - Have a Great Summer collection - Best Life Butterflies
Doodlebug Designs - Butterfly Kisses collection - Garden Party
Lawn Fawn - Bitsy Blooms collection - Begonia
Doodlebug Designs cupcake doily

From my own stash, I used:
Distress Inks
White Cardstock
Doodlebug Designs Foam Stamps 'Simply Sweet' 
Black acrylic paint
Doodlebug Designs Rub-ons 'All Mixed Up' Large, Medium and Small Beetle Black
Doodlebug Designs Sew-Easy Rub-on Stitches
Bazzill Scraps
Leaf and flower dies


I'll be back with the last layout from this kit tomorrow.
Thanks for looking.
Lynn x

Friday, 12 August 2022

First Day of School - Emily

A layout for the  Peartree Cutfiles 2nd Birthday Crop - Challenge #1 Letter 'P' to use Paint and Patterned Paper on your layout.

This is Emily's first day at school, back in 1996.


I used:
Basic Grey letter stickers and papers
Black and White pen
!st Day At School cutfile
Distress Paint - Picket Fence
Doodlebug Designs Foam letter stamps
Bazzill Basics Cardstock


Thanks for looking.
Lynn x

Saturday, 30 April 2022

Chess Champ

This layout was made for a DAF challenge - Sam's Tic-Tac-Toe. I used Splatters, Flair and Wood Veneer.

These photos were taken by my parents when Andrew went to stay with them for a few days in the school holidays. This is Old Town, Hastings.


I used:
Bazzill cardstock in black and white
Black Soot Distress Paint splatters
Tim Holts foam alphabet stamps
Wood veneer numbers
4 DAF flair


Thanks for looking
Lynn x

Thursday, 3 June 2021

Rock Star

Today I'm sharing the last of four layouts for the May Kit from Papermaze.
Little Andrew loved sitting on this rock at our accommodation on holiday in Norfolk!


Please see the scrap, paper scissors blog for further details.

From the Kit I used:
bird clip
Heidi Swapp - Care Free collection - Sunset
Vicki Boutin - Story Teller collection - Mariposa
Jen Hadfield - Reaching Out collection - Stick Together
Bazzill Cardstock -
Parakeet, Classic Blue & Vanilla

From mystash I used:
Blue and green shades of Distress Stain
Distress Paint
Tim Holtz, Type lower cling foam stamps
Dusty Attic mini butterflies and mini dragonflies
Shimmering watercolours - Corney Flower Blue
Tim Holtz Sizzix Thinlits - Bloom Colorize die set.


Thanks for looking. Back with the June Kit soon.
Lynn x

Thursday, 23 August 2012

C.S.I. Case #33 - Shipwrecked

I was chuffed to make the 'On the watch list' last week for my 'Conversation with the sea layout.

Here is my third attempt at the C.S.I. (Colour Stories, Inspiration) challenge
I'm still away from home but this encouraged me to make good use of the items I have here with me. These challenges are great for getting me to use my stash. I was keen to try out this nautical colour combination for challenge #33.


My page records the children on holiday on the Isles of Scilly back in 2000. We we staying on the main Island of St. Mary's but took regular boat trips to the smaller islands. On this particular day we travelled to Tresco. It's dry in this photo, but we spent most of the day exploring the tropical gardens in wet weather gear as it rained nearly all day. In this photo the kids are enjoying the Valhalla museum. (see journalling below).

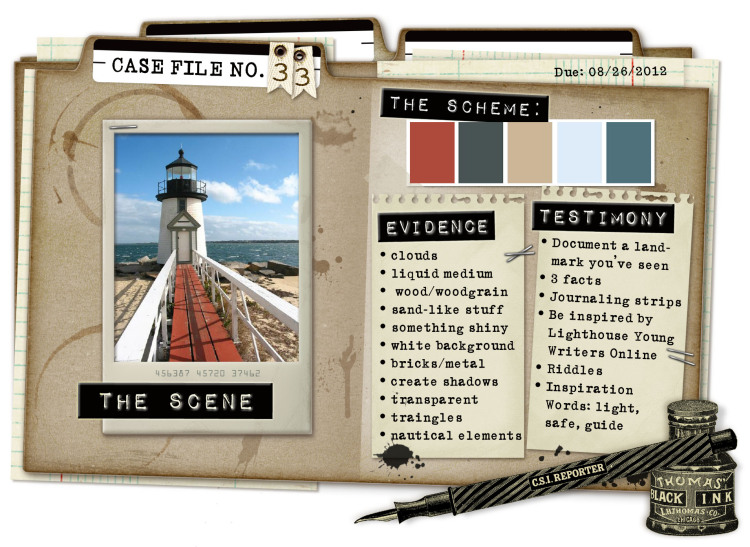
Here is the inspirational case file #33


THE EVIDENCE FROM WHICH YOU NEED TO CHOOSE AT LEAST 2 ELEMENTS
I have highlighted in red the elements I chose to include, and what I used:

wood/woodgrain - My Mind's Eye Miss Caroline - Fiddlesticks 'Love' Woodgrain paper
liquid medium - Acrylic paint 
clouds
something sand-like (e.g., glitter, sand, embossing powder, etc.)
something that shines (inspired by the light in a lighthouse)
Create shadows
white background
bricks
something transparent - watch glasses (over two of the images from the coordinates sheets), glass nuggets and Hambly Screen print Urban Chic Frame overlay.
triangles
metal nautical elements - Making Memories lighthouse metal plate

I also used:
Orange net bag
Basic Grey - pb&j - raspberry jam paper
Basic Grey - Marrakech - blue nights
Twine
Cricut to cut the big frame shape
Li'l Davis Designs Foam Stamps 'Tumbleweed' for the title.


THE TESTIMONY FROM WHICH YOU NEED TO CHOOSE AT LEAST 1 ELEMENT
Again I have highlighted in red the elements I have included.
Document a landmark you've visited.
Write three facts (inspired by the red planks)
Use journaling strips (inspired by the planks)
Go to the Lighthouse Young Writers Online blog to be inspired, and see where it leads you.
Inspiration Words: light, safe, guide-- use these as inspiration for your journaling, not just as a title

My journalling reads ...

"
Andrew, Catherine and Emily on holiday on the Isles of Scilly. We took you on a boattrip to Tresco to visit the  Abbey Gardens. Here you were fascinated by the unique Valhalla collection of some 30 figureheads, as well as name-oards and other decorative ships' carvings dating from middle of the 19th century."


... and is printed onto a postcard from the Coordinates sheets.


 THE COLOURS  - YOU NEED TO USE ALL 5 

Maritime Red - brick red - taken from the walk way
Nautical Gray -
 charcoal, taken from the lighter part of the roof of the lighthouse
Salty Sand -
 sand beige, taken from the sand
Beacon Blue
 - pale sky blue, taken from the lightest part of the sky
Deep Blue Sea -
 bismarck/cadet blue, taken from the water


THE COORDINATES ARE ALSO AVAILABLE TO DOWNLOAD IF YOU WANT THEM


The deadline for completing Case File No. 33
is Sunday, August 26, 11:59 p.m. EST.

I have had great fun scrapping this layout and look forward to doing the next challenge.

Thanks for looking.