h3.post-title font-family: 'Bad Script', cursive
Showing posts with label QuicKutz. Show all posts

Tuesday, 11 July 2023

Summer Sunshine

This month's challenge on the Peartree Cutfile Facebook group, is a summe themed mood board.

I used this photo of me in paddling in the sea with my brother on the left and my sister on the right. I remember this lovely polka dot bikini with affection!


I used:
Acrylic pieces (title and umbrella), and the stencil from the June Peartree Project Pack
Papers from Vicki Boutin
Bazzill Basics Cardstock
Doodlebug Designs Alphabet Soup puffy stickers
A QuicKutz die cut suitcase
Distress Oxide Inks
Baker's Twine
Bikini buttons


This is the moodboard:


Thanks for looking
Lynn x

Sunday, 24 June 2018

Scarlett Rose

Scarlett Rose is the newest member of the family, she is my great niece, born to my nephew Sam and his fiancée Chelsey last November. I can't really believe this cute little baby girl is already 6 months old!


I made this using the delightful April kit from Papermaze, These kits are such great value for money and you get six sheets of patterned paper, 2 sheets of Bazzill and a bag of embellishments. I also had the extra 4 sheets of matched cardstock. The colours are stunning, not sure my photo does them justice. Here is a photo of the kit. I have only made one page so far, but there is plenty more to play with.
 

I used three sheets of Bazzill for the base of this layout. The first was Whirlpool, the second Blossom and the third layer was Lily. I cut the latter two down in size slightly to give a fine border and the former two were gutted.

I just loved the little square designs on the Kind paper from the Be You collection by Pink Fresh. The reminded me of the flower dies in the new Sizzix Thinlits Funky Floral #3 set from Tim Holtz, so I simply had to combine the two!
I used a QuicKutz alphabet for 'SCARLETT ROSE' and another Sizzix Thinlits Tim Holtz set for the months (thanks for the loan Sandra x).  

Thanks for looking
Lynn x

Friday, 9 September 2016

Happy Pearl Wedding Anniversary Lisa and Paul


My lovely friend Liz gave me a die (Die'sire Decadence) for my birthday and this is the first card I have created with it. I used some pearly card from my stash to cut with the die. I cut the centre twice and off set the first one, adding the second over the top in the original position.

I added the lettering with the QuicKutz - Mini Moxi Unicase Alphabet Dies
The die cuts were arreanged on a 6" x 6" card cut from cream Bazzill Basics Cardstock
Tiny flat-backed self adhesive pearls were added to the front of the card. 
The layers are raised up on 3 dimensional sticky foam pads.

Happy Anniversary Lisa and Paul!

Thanks for looking
Lynn x

Saturday, 1 December 2012

Monochromatic - Petite Bebe


For December's challenge over on the Scrapology blog we are challenging you all to create a Monochromatic layout. We are scraplifting the work of Pam Thorburn here blog can be found HERE.

This is the original layout created by Pam


this was our sketch.

I stuck with the white but chose a coloured photograph of my daughter Catherine taken in June 1992 when she was about 10 weeks old. I loved this little romper suit I brought for Catherine, with it's pretty floral print and smocking. It's one I kept and she now treasures.

I used a sheet of Dotted Swiss Bazzill in Salt as my base. I then used a sheet of white Bazzill and cut the following from it:
Two circles - one 3" and one 4" (I used George and Basic Shapes Cartridge and the Cricut)
A scalloped square 5" (I used Cindy Loo Cartridge and the Cricut)
Two Garden Branches using the Marianne Design die and the Big Shot
Three Catalina Wreaths using the Memory Box die and the Big Shot
Two Kaleidoscope Butterflies using the Memory Box die and the Big Shot

With scraps of the white card punch:
Twice with the Martha Stewart 3 in 1 butterfly punch
Twice with the Martha Stewart 3 in 1 hydrangea punch
Four times with the Martha Stewart frond punch

Take the circles and run through the Big shot using the Cuttlebug Elegant Birds embossing folder.
Trim 1 1/2" from one side of the scalloped square and run this through the dandelion embossing folder.

I printed the photo to the size of 4" x 6" and then used my 4" circle as a template to cut the photo.

Then I arranged the circles, scalloped square and photo on the background, adding a doily under the photo. This was all stuck down into position. I arranged  the two Catalina wreaths overlapping one another and the embossed circles, these were stuck down in just a few places with a sticky foam pad under each of the larger flowers, thus leaving the wreath free to appear to be hovering off the page. It also allows for other items to be tucked in place later.

Add the two large Memory Box butterflies  one to the top right of the page and the other to the left of the larger circle - only sticking the bodies to the page so the wings are free. Add a few of the smaller butterflies above the latter in the same way.

Stick a strip of DST from the bottom centre of the photo out to the right of the layout to end at the edge of the the scalloped circle. Stick white satin ribbon over the tape pleating as you go.

Stick the two Marianne Garden Branches to the page one to the left of the ribbon reaching out to the left, the other from the bottom centre of the photo, trailing to the bottom of the layout, slightly over to the left.

Now to destroy the blossoms and leaves - Maw ha ha ha! Take the wires and any green leaves and yellow stamen off! Arrange a selection of flowers onto the page with the larger ones nearer the photo trailing down in size towards the left corner of the page. I used two white wires from the leaves to extend from the flowers, adding tiny roses at the ends and some small blossoms halfway down.
I added some petal shapes from the 3 in 1 Hydrangea punch over the centre of some of the flowers where green or yellow bits still showed, layering these up where appropriate. Add some punched leaf fronds here and there.

I added a blossom, two punched fronds and a tiny rose to the right hand end of the ribbon.

I curled up four white wires to add as tendrils from the blossoms. Also add the silk leaves.

Use flat backed pearls to add centres to some of the blossoms.

With White Opal Liquid Pearls add tiny dots around the large circle and some slightly larger dots around the scalloped edges of the square. I then added some random dots to the branches and the wreaths.

Finally cut the title in white Bazzill using Lucy QuickKuts alphabet dies. Stick to the bottom right of the layout. Highlight the title with some Glossy Accents.

Pop over to Scrapology Blog for more details of the challenge and the prize and to see what the rest of the DT created.

Thanks for looking
Lynn x

Wednesday, 24 October 2012

English Rose - Lake House

Using Lake House papers from Kaiser Craft I designed this class page for the Cardinal Colours Crop last weekend. The photo of my Mum was taken by my Dad.


I used a paper doily
Chrysanthemums, cherry blossoms, two sizes of roses and two sizes of rose leaves from Wild Orchid Crafts.


A cameo made with Lite Fimo air dry clay and a cake decorating mold painted with Acrylic paints and a scalloped oval cut with the Cricut.


Wide organza ribbon
Marianne die


Martha Stewart 3 in 1 Hydrangea punch 


Liquid pearls
The Title was cut with the Lucy alphabet and the Quickutz


Martha Stewart Round the page punches


Everyone seemed to enjoy the class and I'm looking forward to seeing their finished pages.
Thanks for looking
Lynn x

Here is the layout created by Sandra in my class:


And this is Anita's version:


Monday, 2 July 2012

Garden Girl


This layout shows my daughter Emily dressed for a dance show.
 Over on scrapology this month we are scraplifting Gabrielle Polloco and challenging you to use YARN on your layout. Here is Gabrielle's original layout using Bo Bunny's Country Garden papers ...
 .. and our sketch

I also used Bo Bunny papers and selected seeds, stripe and cut outs.


Here is what I did:

Cut green garden stripe paper, to leave a 1” border frame, distress and ink the outer edges.

I used Seeds paper cut down to 11.5” x 11.5” by taking some off more than two sides to keep the parts of design I wanted. I didn't worry about cutting off stitches as I planned to add them back in later. Distress and ink the edges. Stick blue paper to green border centrally, giving a border of 0.25” all round.

Decorate with some brown machine stitches.

Distress and ink the edges of photo and mount onto green paper leaving a very thin border. Machine stitch in white round the photo edges, starting and beginning at the bottom as this will be hidden. Distress and ink the edges of green paper.

Cut stripe paper vertically as wide as you can and approx. 6” long. Distress, ink and stitch around three sides. Select two panels from ‘Cut Out sheet and treat as stripe. Stick stripe piece lightly on layout about 3” down from top and 1.75” in from the left.

Draw a 6.8” circle very lightly in pencil, and zig-zag stitch around the lines (start and stop where the stitches won’t show). If pencil lines show, carefully rub away. Stick other panels into place.

POTTED PLANT - Cut flower pot in Kraft Bazzill using QuicKutz die. Shade with chalk inks. Add top to pot with 3D foam pads. Cut ‘stick’ from brown Bazzill using Cricut and 'Doodlecharms' cartridge at 3” and add to pot.

Use pink coloured section of spare patterend papers and punch out lots of petals with Martha Stewart ‘Hydranga’ punch. Ink in pink and layer up on stick to make potted hydrangea. Decorate the centres with stickles, perfect pearls or flat backed pearls. Stick plan to left of layout.

BRANCH - Cut 2” branch and leaves from brown and green Bazzill using ‘Straight from the Nest’ Cricut Cartridge. Add to top left of page and add blossoms cut and prepared in the same way as the Hydrangea.

BANNER - Cut ‘Believe in Yourself’ banner from ‘cut out ‘ sheet, ink the edges and add over banner on layout wit 3D foam pads.

FLOWER BED / FENCE - Cut flower bed from brown Bazzill using template provided. Stick along base of photo. Cut two fence panels at 1.5” using white Bazzill and Paper Dolls Dress Up Cartridge for Cricut. Ink, overlap and stick together to make one longer fence. Stick with 3D foam pads towards bas of flower bed.

Make 9  mini seed packs using QK die and Kraft Bazzill. Draw some tiny seed pack images. Cut out and stick images to packets. Cut some spare Brown Bazzill into thin strips to make sticks to add to seed packets. Arrange in flower bed, slightly behind fence so the peep over the top.
Add garden twine to fence twisting and looping along the way.

I drew the little seed packet images and coloured them with my Promarkers. Because Linda and I make up kits which we sell via Cradinal Colours I made these images available in black and white as well as colour for the kits. I am aslo happy to send your the images to anyone who wants them - just drop me an email.

Cut butterflies from patterned paper and arrange on layout.

Add some blossoms and flat backed pearls for centres.

Use Cricut and ‘George and Basic Shapes’ cartridge cut a title 1” high with shadow using brown and green Bazzill. Add title to top right of layout.

Write journalling on one of the panels beside the photo.

And it's finished!

Thanks for looking. Please pop over to scrapology for more details of the challenge and prize.

Monday, 2 January 2012

Christmas 1998 and a Double Layout


This is the double page I made for the 'T is for Texture' Scrapology challenge for January. I used photos of my family from Christmas 1998. Because the colours were so mixed I changed them all to sepia before printing them out.

This month we are scraplifting a layout by Stacey Hansen, called 'Life is a Highway', from September 2011 Creating Keepsakes Magazine. We are challenging you to use lots of texture (or lumpy bits), make a double layout and lots of photographs.

This is the original layout.
and our sketch
A closer look -
Left hand page

Right hand page 

I used:
2 sheets Red Bazzill cardstock
1 sheet Leapfrog Bazzill cardstock
1 sheet Salt Dotted Swiss Bazzill Cardstock
QuicKuts dies - Poinsettia, treelights, Lucy Alphabet
Creative Memories Large Circle Template


The patterned papers are American Crafts Christmas Dear Lizzy collection, Twinkling Tree, Gracious Gifts, Garland Greetings and Poinsettia and Pine.


Here is what I did:
Use the two pieces of red cardstock as a base for the double layout.

Cut two pieces of diagonal red white and green stripe, 4" x 12", use TT FUNdamental Postage Stamp template to draw pattern along the top of both pieces, just to mark where to cut, then using a small 5/8" circle punch cut notches in place.  Stick these to each piece of red about 2" up from the bottom so the pattern runs right across both pages, leave top unstuck to allow for tucking circle and bracket in place later.

Use a medium sized 'Swanky Frame' TT FUNdamental shape as a template. With Leapfrog cardstock cut half a frame following the outside edge of this shape. Cut a piece from holly paper using the inner frame as a guide. Mount the holly paper on top of the green, and tuck this under the diagonal striped paper on the right side of the layout to the right of this piece, about 3" down from the top. Trim where this overlaps the side of the layout.

Cut about 3/4 of a circle using the outer edge of the CM template and the fine stripe paper. Cut the inner circle from the dotted Swiss cardstock. Mount white over stripe and cut down the centre. Mount half of this shape on each side of the layout so they meet in the middle. See sketch for placement, but this is also about 3" down from the top. This is also tucked under the diagonal striped paper, and all is stuck down. (I wanted a little spare red cardstock for making flowers, so I gutted some from under where the circle is going to sit before sticking all down for this purpose!).

I ran a wide red grosgrain ribbon with a white stitch effect across the bottom of the diagonal striped paper, then added a 5mm green satin ribbon on top of this, with a green bow to the left side of the left page.

I matted all my photos in white and arranged them across the layout as in the sketch (roughly).

Then I dusted off the QuicKutz, which has been neglected since I acquired my Cricut!  I got busy and cut 16 poinsettia petals and 16 leaves, arranging these in pairs to make 8 flowers. I curved the petals with the scissor blade and attached each pair together with a gold brad, these were added to the layout with a 3D foam pad. The leaves were added later, 2 to each flower. Then I cut lots of small tree bulbs and arranged in a garland along the top of the layout, each of these is raised on a tiny piece of 3D foam too.

Next I cut my title using Leapfrog cardstock and the Lucy Alphabet dies. I arranged these letters inside the white circle.

Thanks for looking.
If you want more details of this challenge please go to the post titled 'T is for Texture' of 01/01/12 on the Scrapology blog.

Thursday, 15 December 2011

Happy Birthday Sue!

It was Sue's birthday yesterday, but I couldn't share this card until today as it was designed for the Scrapology DT November Card Challenge which was published today. So here it is!


I made it with a photograph I took in Rendlesham Forest. Based on a similar idea to Elaine's Card.

Patterned papers - Magnolia
Card Blank - Craftwork Cards
Stamps - Stampin' Up greeting, Lili of theValley image
Leaves - brown parcel paper, green bazzill
Inks - Color Box chalk inks
Pens - Promarkers
Die's - QuicKutz

Happy birthday Sue!

Tuesday, 28 June 2011

Romantic Gate-fold Cards


As promised another set of cards I made for Quick Cards Made Easy Magazine a while ago.

The technique was making a GATE FOLD CARDS and the theme was LOVE.

All the cards in the collection were made with the Twitterpated papers and accessories by SEI.

SWEETHEART

Love in Bloom and Be Mine papers and die cut tags Twitterpated paper by SEI
Warm red fluid chalk inkpad by Color Box
Paige Mini Alphabet dies by QuicKutz
Folk heart die by QuicKutz
Scraps of pink cardstock
Girls are Weird alphabet stickers by Provo Craft
Pink Trios brads by Queen & Co.

1ST ANNIVERSARY

XOXO Twitterpated paper, tabs & frames and die cut tags by SEI
Sticker fixer pads
Pink ribbon
Scraps of pink and white card
Warm red fluid chalk inkpad by Color Box
Paige Mini Alphabet dies by QuicKutz
Folk heart die by QuicKutz
Girls are Weird alphabet stickers by Provo Craft


I LOVE YOU


Love in Bloom & Love Petals Twitterpated papers by SEI
Pink embroidery thread by DMC
Warm red fluid chalk inkpad by Color Box
Girls are Weird alphabet stickers by Provo Craft
Heart shaped buttons by Doodlebug Designs
Love word charm by Making Memories.


HEART THROB

Heart throb paper and tabs and frames - Twitterpated collection by SEI
Sticky fixer pads
Scrap of white card
Warm red fluid chalk inkpad by Color Box


ENGAGEMENT

Love in Bloom & Valentine Velvet papers from the Twitterpated  by SEI
Red brads by Making Memories
Pink card
Pink blossoms by Got flowers
Girls are Weird alphabet stickers by Provo Craft


Thanks for looking, more to follow next month.
Lynn x

Monday, 14 February 2011

Valentine Mess!

Let's set the scene ...................


 kids all away from home ...........


................ valentine cards exchanged .........


Easel card with Craftwork Cards card, candi and papers, Quickutz dies and Martha Stewart punch.


.............. roses received ...............


.................. Cup cakes made ................


.......... shopping for evening meal complete .......


................. table prepared ....................


................. candle lit .................................


................ meal in oven cooking away nicely, cannelloni and stuffed peppers .................


............... oven timer sounds ........................


................. dinner spread all over floor and everything in it's way!!!


When we moved in the oven had no shelves so we had to buy some of a different make. I opened the oven and the dinner shot out to meet me!  So I had to wash the floor and myself and change before we could eat what was left of our dinner!

HAPPY VALENTINE'S DAY ALAN! X

Monday, 29 March 2010

Bon Voyage!


Feeling under the weather today, but luckily I don't have to work. Catherine has an auditon at Rose Bruford College in Sidcup, and has gone along with a friend from school who also has an audition.

I made this card a little while ago. I was asked by a colleague to make a Bon Voyage card for her friend who was emigrating to Australia. When I was busy making it I cut lots of extra bits and pieces with the QuicKuts Travel kit and other dies and made a second card, thinking it would come in handy one day. I never dreamt that my brother would be travelling to Brazil at that time. However he is going there this week, so I thought I would send him this card. I will be able to give this to him tomorrow as we are going out for a meal to celebrate my children's 18th birthdays. The card blank is from Craftwork Cards.

I have also been busy today writing cards for birthdays and Easter. I have added Easter greetings to several of the spring like cards I have made recently. I have wrapped a lot of gifts. It looks like a spring version of Christmas in my lounge!

Friday, 16 October 2009

It's a Family Thing


I saw a beautiful layout called 'All things grow with love' by Lynn Biermann (see below) on the Basic Grey website and then again when I was looking on Scrapbook.com. I love the way the hearts work around the scalloped circle to make such an interesting shape. Lynn's inspiration came from a sketch by Liz Qualman.

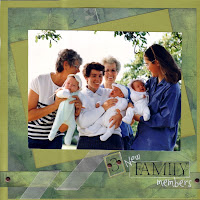
Often if I decide to scrap lift, I will choose different papers, but these colours work so well with the photo of the triplets, and I just happened to have them both left in my Lemonade collection pack, so I decided to stick to the same papers and colours.
The photo I have used is the one I posted about a few weeks ago -
Seventeen Years Later, same adults, new set of triplets!


I used my QuicKutz dies for the all three hearts and the flower stems. The flowers are cut using two different size retro flower punches. My lettering was created with Basic Grey rubons and Making Memories felt alphabet stickers. I made use of scraps of lace and ribbon. There are a lot of crystals on this layout, I used the smallest pink and blue gems I could find in my sash. I bought the beautiful Flutter Vine embellishment by Prima from Cardinal Colours at the last crop.


If you want to see more of Lynn's work pop on to her blog, Pretty Paper Swirls, or take a peek at her layouts on Scrapbook.com where she is known as 'Foamy'. Well worth a closer look.
Just popped back to add this image of the layout I did about four years ago using the photo from seventeen years ago!